Simply Resourceful

Simple ways to be more conscious about how we use our resources.

Homemade Seed Packets

Jon and I began seed saving last year and want to share with you how we make our own packets for storage.  Some gardeners I have talked to save their own seeds and others think it's not worth the time because seeds are relatively cheap; after all, some crops such as carrots, beets, and leeks take 2 growing seasons to produce seeds.  One perk to letting some plants go to seed is that more color and beauty is added to the garden attracting beneficial insects and pollinators such as honeybees.  One plant going to seed in our garden right now is leeks.  They are absolutely beautiful!  They produce colorful globes that are about 5 feet tall and sway in the wind (picture below) - they look just like globe allium except you get the benefit of them being edible.  Saving seeds also gives a gardener food security and lets the gardener pick and choose seeds from the most prolific plants or from plants that have enhanced genetics that make them resistant to certain bugs, or fruit earlier, or have sweeter fruits, or blossom later to avoid spring frosts.  It's all in the seed.  Saving them from your garden will ensure you have the best genetics targeted for your exact garden and climate.

What do think about saving seeds?  What is your main reason for saving seeds or not to save them?
Please leave a comment below.

The honeybees really enjoy the leeks!


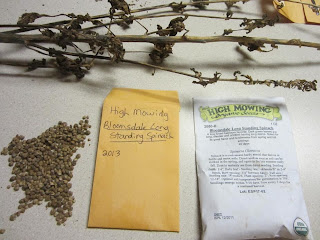
For storing seeds, I make our own packets by reusing manila envelopes.  

To simplify the process I cut out four packets using the already sealed seems on the existing envelope.

I add a little glue to seal the remaining sides...

and write the company name, seed name, and year collected on the packet. 

Seed packets are stored in this box in our basement.

I had to add these last two pictures of the mushroom hunt today in our woods.  There are mushrooms everywhere and most we haven't been able to identify.  The ones we did keep and feel confident eating are the chanterelles shown below.  


Updates at the Wolfe House

It's been awhile since I gave a general update of what's been going on around here so I've been taking pictures the past 2 weeks so you can see what we're up to.

I think the bees are looking great this year!  This is our newest hive that arrived as a package April 8th.  It was give 19 frames of bare foundation and one frame with drawn comb.  This is what they looked like after cracking the lid---good overall spread of bees covering the frames in the top brood box. 

This is the top honey super in the Warrior Hive that survived the winter.  They were given an empty brood box and so far they have filled 5 frames.  The honey supers are about half full and the full frames are just bursting with capped honey!  They are working hard drawing comb on about 25 empty frames this summer and they are almost all filled!

Sorry no pictures of actual frames this time.  I typically don't pull frames out of my hives because my bees tend to glue their frames together and breaking the comb is a sure way to upset them.  This is what happens when the honey supers get separated.  I could scrape off this burr comb but there's a lot of honey and nectar so I'll leave it for the bees. 

As for the garden, a couple that we met through the homesteader's group offered us some of their goat manure.  How can we say no to that offer?  

The tomatoes have been thriving this spring with the chicken mulch and now we added the goat manure.  This year we ended up with 65 tomato plants!  Many were given to us by friends and several were volunteers that we decided to let grow just to see what happens.  We didn't receive a large tomato crop last year so the cellar is pretty sparse with tomato preserves.  We're making up for it this year so I can stock up on plenty of salsa, stewed tomatoes, and tomato paste to last us at least a year.

The garden has been our biggest project this spring because we expanded it and then went on a 2 week vacation towards the end of May which delayed planting.  For whatever reason, the weeds didn't get the memo to also take a vacation.  Weeding takes about 90% of our time in the garden.  For 3 weeks straight we have been weeding at least 1 hour each day to catch up from the 2 week vacation. Weeding is part of gardening that I have learned to live with because they will never go away.  It kind of becomes a meditative time for me because it's pretty monotonous...just me sitting on a bucket with a small hoe.  The first crops to get weeded were the itty bitty's such as carrots, beets, salsify, onions, and other small plants.  The final crop to get attention is the potatoes.  In the picture above you can see one of the potato patches.  This year they are looking really good!  Fortunately we caught the potato bugs early in the season before they did too much damage.  They are quite disgusting when they pop. 

And of course...cabbage worms.  What's more to say other than grrrrrr!!!  These pesky critters take way too much of our garden time.  They hide everywhere and their population levels never seem to dwindle.  Each year we plant brassicas and question whether they are worth the time.  We've been told that row covers help keep the moths off the plants so we plan to try them next year. 

Here is another type of cabbage worm hiding in the broccoli floret. 

To keep a steady egg supply we purchased 3 more chicks this year.  We purchased these from our mail deliverer after we returned from vacation.  They are the barred rock variety and adjusting to their new home just fine.  This chicken tractor has really paid off because it keeps the young chickens safe from predators and allows the older chickens to get acquainted with them without any personal contact.


Fall & Winter 2012 Woodworking Projects


Stools made out of logs from the woods.


Catapult for Paul made out of chair legs, plywood, eye hook, and rubberband.  This thing really launches Duplo Legos!


A shadow box for a friend who is graduating from medical school. 


Jon constructs all of the honeybee hive components except for the brood boxes and frames.  For awhile he was using the router to make the brood boxes but that wasn't very safe.  Someday we hope to find a good deal on a table saw so he can make the brood boxes.  


Jon's mom makes quilts and does long arm sewing for clients so we made her a quilt rack out of logs gathered from our woods as her Christmas gift. 


My nephew is really into baseball so for Christmas I made him this to hang on the wall.  It holds a bat, ball, and glove.


We couldn't wait for this to be finished...a little more organization at the front door!

Finally something more durable for storing seeds!  We had a mouse last year get into the plastic containers that were hard to seal.  The lid for this new container is made entirely with recycled pallets.

   
Jon made a wine rack completely out of pallets!

A loveseat made with aspen logs from Wyoming and some walnut logs from our property in West Virginia.


A potato crate made completely out of pallets.


Beets Grow Better with Cow Manure

Last spring we ordered 5 tons of cow manure from a local farmer.  In the fall we added the manure to the garden and rotor-tilled it this spring.  What a difference this manure has made!  Check out the pictures below, click to enlarge them.

The Detroit Beets definitely show us where the manure wasn't added.  All of the seeds are the same variety and planted on the same day but the seeds in front produced a lot better.  

This picture was taken from the opposite direction.  Can you see the difference?  Last summer the beets limped along all summer and were woody in the fall---now we can see why!  Even the cabbage shown on the right depicts a lack of manure in the middle.  If you look in the background of this picture you will see bright green tufts---that is bolted lettuce.  Using lettuce for row markers works really well!

Last fall Jon planted beets hoping they would overwinter and be ready in the spring.  Turned out they bolted right away this spring and are now producing seeds!  We have never let beets bolt so we plan to gather seeds this year. 

Paul was pretty excited to pull the beets for thinning!

And we all enjoyed a tasty dinner of boiled beets, stir fried bok choy & scapes, pea pods, and beet leaf salad with hard boiled eggs---all from our homestead.


Homemade Strawberry Soda

Our strawberry patch is producing really well for its 2nd year and we are busy filling bags for the freezer, making jam, strawberry wine, and soda!  I included step-by-step instructions on how to make strawberry soda so you can enjoy a homemade beverage right at home.  This recipe can be adapted for all berries.


1 1/3 cups mashed strawberries
1 1/2 cups sugar (preferably brown cane)
7 cups water
1 T lemon juice

8 cups cool water
1/8 tsp. champagne yeast

-Add the first 4 ingredients to soup pot, bring to boil and simmer for 20 minutes.
-Remove from stovetop and allow to cool slightly.


-In a gallon glass jug add 8 cups cool water and add the strawberry mixture. 


-Let it cool until the soda reaches a temperature around 90 degrees.


-Add yeast to jar and shake vigorously to incorporate throughout.


-Using a funnel, pour soda into grolsch bottles.


-Fill right below the neck of the bottle.


-Store bottles at room temperature in a cooler or somewhere that keeps the bottles contained in case a bottle blows up from too much carbonation.  We learned the hard way and stored them in a sealed cardboard box on the kitchen counter...a bottle blew up, opened the cardboard box, and splattered soda everywhere, including the ceiling that had to be repainted.  

-Everyday check the bottles for carbonation.  It's difficult to explain how to tell when the carbonation is perfect, but we push on the cap and listen for the hiss of air that escapes when pressure is applied.  You want a medium to strong hiss.  On your first batch you can refrigerate the bottles on consecutive days so you get an idea how the hiss becomes stronger the longer they are left to carbonate and how the carbonation levels affect the final product.  (We recommend wearing safety goggles for this.)  

-When the soda is at the right carbonation, store bottles in the refrigeration to halt the yeast and use within about 2 weeks.  Common question is how long do the bottles take to carbonate...that all depends on the temperature of the soda when the yeast was added and how warm the storage room is.  This batch took 24 hours but in the winter it can take about 5 days.   

-If you prefer, you can strain the berries and yeast sediment before drinking, but it's not necessary.


About this blog

A weekly update on our adventures of trying to be more self-sufficient by using resources wisely. We explore a variety of topics that most broadly fit in the "Homesteading" category, i.e. beekeeping, organic gardening, edible landscaping/fruit forest, food preservation/canning, woodworking, soap-making, and environmental stewardship.

Search My Blog

I've been featured on:


Followers

Facebook

Contact Form

Name

Email *

Message *

Powered by Blogger.