Simply Resourceful

Simple ways to be more conscious about how we use our resources.

Solar Food Dehydrator


There are many designs for solar food dehydrators and we decided to use the design by Eben Fodor in his book: The Solar Food Dryer.  Here is a website about this book.

There are a lot of steps to making this so I decided to not include the detailed instructions and pictures with each step.  If you are interested in the details and specific dimensions, borrow the book from your library (like we did) or purchase it.  We used an old window from when we had our windows replaced, so we modified the dimensions.  Our dryer is: 35.5" by 27.5"

Here's a breakdown of pricing:
4x8 sheet of birch plywood: $32.17  (we only used about half of it)
3 Food grade safe screens: $29.90 including shipping (purchased from the book's website)
Screws: $1.25
Hinges: $5.04
Sheet Metal: 11.78
Weatherstripping: $3.49
Wood for legs, shelves, etc: Free
Thermometer: Free
Window: Free

We wish all of the materials could have been reused from other projects, but we don't have large sheets of wood lying around.  Purchasing and transporting the wood was an adventure.  The plywood we purchased was FSC Certified and therefore cost $7.00 more than other non-FSC plywood which looked a lot nicer.  It was one of those moral dilemmas in the hardware store.  FSC means the wood came from responsibly managed forests.  Transporting this large sheet of plywood was quite the experience.  With the help of our cargo bicycle trailer, we propped the 4x8 sheet of plywood on it.  I walked behind the trailer holding the board steady, while Jon steered the bicycle.  We only had one mile to walk this thing---a brisk 15 minute walk with a lot of questionable stares from onlookers.  I planned to take a picture of our caravan, but it started to sprinkle the remaining .25 mile (of course!) so the wood went in the garage asap.  With only a '98 Honda Accord, we are creative in our transportation options.  We have yet to find a really good reason to have a truck or SUV.  A small car meets our needs; and when it doesn't, we use our bicycles and legs or borrow a truck.  (The benefits to living in the city.)


(Jon putting together the shelf supports.)


(The dehydrator almost finished...)

(Dehydrator finished!)

(Back door and heat vent open.)

(Close-up view of the inside.)


(If you click on the picture, it will enlarge.  The thermometer has a reading of 130 degrees which is quite warm considering there were some clouds in the sky and the outside temperature was only 75 degrees.  It only took 2 hours to reach this temperature.  In the picture, you can see the back vent completely open to help regulate the temperature inside the dehydrator.) 


(Attaching the screen to the frame.  The screen is food-grade safe.  I would recommend spending the extra money for these because you don't want plastic chemicals like BPA in your food.)

(Our first test was drying herbs.  In these two pictures, Oregano is drying.)


(This is a close-up of the metal clasps we used to secure the window and weatherstripping to the dehydrator frame.  These clasps were found in our "junk drawer" in the garage.  I think they were used to hang curtains?)


Birds and the Bees

Beekeeping sure has its surprises and challenges.  For about a month now my girls have been under constant attack from the Western Tanager bird.  No other bird species has posed a threat to my bees until the Western Tanager.  I'm certainly not an ornithologist but I have been watchful of birds in my yard and recognize some bird calls.  In particular, I enjoy hearing the woodpeckers drum on our fireplace vent followed by their chirps to a hopeful mate!

When I first saw the Western Tanager, I thought, "How pretty!  I've never seen these birds before!"  I continued to admire the yellow breasts and red heads until suddenly I saw these birds dive bombing the hives and pecking at the entrances.  They are very confident birds because they hover in front of the hive entrance to lure the guard bees out, and then BAM the bees are gone!!  These birds work in pairs, sitting outside the hive entrances literally picking the bees as they meander out onto the landing board.  In particular, these birds are active in the cold early morning when only a few bees are out doing their cleansing flights.  By midday when the colonies have woken up and are swarming around the hive entrances, the birds are gone.

I am so tempted to get a slingshot or pellet gun and injure a few birds to scare them off, but I see that as a little bit too cruel.  I have even seen the neighborhood cat crouching in the bushes feet from the hive with no success!  These birds are fast and ruthless.  I gave a shout out to a bee listserve I subscribe to, and other beekeepers in the Portland area are having the same problem.  They have never seen this bird at their hives in years past.  Maybe the birds' regular food supply has depleted, or maybe they find it easier to sit outside a hive where they don't have to do any work?  Either way, I'm upset because my colonies are still trying to get themselves established, and dang-it, I want honey!

I'm quite certain that the 4 birds that continue to come back have had a serious impact on my two colonies.  It is rather frustrating, so I've tried a few alternatives to the slingshot.  I've tried hanging CDs in the trees----didn't work.  I've tried putting my son's alligator on top of one of the hives (to mimic a predator)-----didn't work.  I've tried netting over the hives----didn't work because it confuses the bees and the birds still dive bomb the bees after they leave the hive.  I'm thinking of getting one of those owls but I don't want my yard to have all that tacky lawn ornament stuff.  I'm still trying to locate an ornithology group in Portland for recommendations.  The only sure way to keep the birds away, is for a person to be in the yard which is impossible every day.  I tried to get a picture of the birds by the hives, but they are quick flyers, so here's a picture of my hives with a few CDs and my son's alligator on the roof.

picture taken: 6-3-2011


From Chair to Stool

If you are wanting to delve into woodworking, sewing, canning, or other arts that are not as commonly practiced in this modern civilization, you will discover that your friends and family will give you stuff.  I am routinely given stuff such as fabric, wood, clothes that need a button or new elastic, the old fashioned push-style lawnmower, yarn, canning jars, and more.  I enjoy all of these gifts and appreciate everyone's generosity!  Two months ago, a friend gave me a broken chair.  A spindle was broken and a leg was missing.  I don't have a lathe so I couldn't fix it and make it into a chair again.  I've been mulling over what to do with this wood loot, and decided on a small milking stool.  A milking stool is a small, close to the ground, 3-legged stool that a milkmaid (aka farmer) sits on when milking a cow.  These aren't traditionally used anymore now that we have industrialized milking machines, so most often you will find these in antique stores to be used for decoration.

This is a picture of a milking stool my Great Grandpa Harley used until the mid-1950's when he decided to purchase electric milking machines.  It is a family heirloom now and sits on a shelf in my mom's sewing room.  I wonder how many hours my Grandpa sat on this stool??

This picture is the scrap wood I was given.  I asked a few carpenters what wood the chair is made out of.  They suspect it's ash.  I was lucky to have mostly raw wood to work with.  There was only a tiny bit of polyurethane on the legs.


I forgot to take pictures throughout the entire process, but here are the steps: 

1. Draw your circle on a piece of paper or directly on the wood you are going to cut.  (My stool seat is 11 inches in diameter and the legs are 8.5 inches tall.)
2.  Using a jigsaw, cut out the circle.
3. Using a protractor, make 3 marks 120 degrees from each other on the top-side of the stool, 1.25 inches from the outer edge of the stool seat.  These marks are for the stool legs. 
4. Tilt the drill press to 10 degrees and drill the three holes.  My stool legs are 1 inch in diameter so I used a 1 inch spade drill bit. 
5.  This step is for making the legs of your stool.  Even though I used the legs from the broken chair, I did have to shape the ends so they would fit through the holes in the stool seat.  I used the bench sander and orbital sander to accomplish this. (Note, the legs will stick through the top of the seat, this is okay, the excess will be sanded of later.)
6.  Cut the bottoms of the legs using a chop saw tilted at 10 degrees.  This will ensure your legs sit flat on the floor. 
7.  Sand everything smooth and round the edges of the stool seat.  An orbital sander works great for this.  Depending on the type of wood you use, a router may be necessary for the stool edge.  The wood I was working with was a soft wood, so the orbital sander did just fine rounding the edge.
8.  Use wood glue to secure the legs in the stool.  A tenon wedge is optional.  (I didn't do this.)
9.  Sand the legs sticking through the top of the stool so the surface is flat. 
10.  Seal the wood.  I used a beeswax & linseed oil mixture (Tried and True brand). 


Handmade Purse From Recycled Materials

In the past few years, an explosion of cute bags and purses have erupted into stores.  Everywhere I look, I see women carrying cute handbags and purses.  In fabric stores, there are oodles of purse and bag patterns hanging from racks.  Only on occasion do I use a purse and it's usually when I am dressed up to go somewhere special.  My wallet usually fits snuggly in my coat pocket for daily errands.  I am a minimalist and find extra bags a distraction for fear of setting it down and forgetting it, but I do want a nice purse for that special occasion.  Anyway, I decided to save some money and make my own customized purse.  I don't need a large one to carry everything including the kitchen sink (that's more of a diaper bag).  I just want something small to carry a wallet, cell phone, and comb.  Here is what I came up with:


Most of the purse was put together using recycled materials.  The main body of the purse came from an old wool sweater that had holes in the elbows.  To give the wool a little more shape, I sewed it to some dark cotton fabric leftover from a curtain project.  The flower centers are buttons that I retrieved from my button jar.  The buttons on the 3 small flowers came from an old pair of sandals I wore 10 years ago.  The flowers are made from recycled wool fabric from various items of used clothing.  Only the lining, magnetic clasp, and strap were purchased new at a local fabric store.  For extra touch, I added a small pocket inside to hold lip balm, wallet pictures, etc.  This project took about 4 hours to make.  I learned some new sewing skills in the process too!


Square Foot Gardening

Jon decided to try the square foot gardening technique this year.  He learned this technique from Mel Bartholomew's book, All New Square Foot Gardening: Grow More in Less Space!  The garden beds will be segmented in 1 foot squares compared to the traditional method of planting everything in rows.  Square foot gardening saves more seeds and encourages biodiversity in your garden beds.  To keep track of the 1 foot segments, the gardener needs to devise a system of keeping track of the borders.  Jon came up with this idea using all scrap wood from our garage.  (Patent Pending)


 These cross pieces mark the four quadrants.


The square foot garden method also advises how many seeds to plant in each square plot depending on the plant variety.  Here's one website we referenced.  Using this method, the gardener isn't wasting seeds from thinning seedlings.

To make seed planting easy and efficient, Jon devised this 1x1 foot seed planting spacer.  (Patent Pending)  The numbers indicate the spacing of the seeds.  For instance, if you were to plant carrots that are spaced every 3 inches, then you would drop the seeds down all of the holes with the number 3.


Milk in a Glass Bottle

I remember reading awhile back that if you are able to get your hands on some raw milk, that you have been blessed by the dairy Gods.  Milk in the grocery store has changed dramatically in the past few decades with homgenization and pasteurization.  Milk is heated to high temperatures to kill all of the bad bacteria that could potentially make some people sick; but in the process, the high temperatures kill good vitamins and minerals.  These vitamins and other essential nutrients are then added back into the milk.  I grew up on a dairy farm the first 8 years of my life, and I remember walking to the milk house, dipping a pitcher into the bulk tank, and retrieving fresh milk straight from the cow.  It was heavenly!!  Each morning, the cream would rise to the top and we would have to stir it back into the milk.  

My taste buds have changed throughout the years; so much that I rarely drink a fresh glass of milk.  The taste just doesn't hit the spot for me.  Paul enjoys milk, and we want to give him the best food we can, so Jon and I don't purchase dairy products unless it states "Rbst-free on the container." 


While shopping at the grocery store recently, Jon picked out the only milk that can be purchased out of a glass container.  It was exciting, something new!  The glass containers lack a detailed label, but one can tell just from the taste that it is different from all the rest.  Cream settles on the top and it just tastes better.  I wrote the store asking for details about this product.  Here is what they said: 

Straus Family Creamery milk.  It is organic and hormone free (as well as antibiotic free).  And if I may quote from their web site:  "All of our milk products are pasteurized at 170F degrees for a total of 19 seconds, about the same temperature as a nice toasty cup of hot chocolate. Unlike most organic milk (which is ultra-pasteurized at 280F degrees for 2-4 seconds), you'll really taste the true flavor of our cows’ diet. Our grasses tend to be sweeter because of the salty ocean air out here in northern Marin."  The milk is not homogenized, and therefore, depending upon which type you are drinking, you will find a nice little layer of cream floating on the top (easily mixed back into the milk). 

Jon and I really enjoy this milk!  We also like the glass bottle (which has a deposit).  I'm really not that old, but I can still remember when my Mom returned glass Pepsi bottles to the grocery store.  The more I read about plastic (Slow Death by Rubber Duck), the more I am motivated to keep it out of our home.  Even if plastic is recyclable, (e.g. milk jug), there are still things to be considered.  Each time plastic is recycled, the chemical structure is weakened and its quality is reduced.  Plastic also comes from petroleum.  Here in Oregon, our plastics are shipped by boat to China where it is melted and changed back into more plastic stuff (e.g. toys) and sent back to us.  The system is completely unsustainable on so many levels considering the environmental laws (or lack thereof) in China and all of the nasty stuff (e.g. BPA, lead, etc.) that has been added to the plastic which have health concerns for all of us. 


I made homemade butter from the whipping cream.  I find it amazing that a white liquid turns yellow after 10 minutes of mixing it!!  A great compliment to Jon's homemade bread!


Beeswax Rendering and Lip Balm

A friend of mine recently asked me to join her in making lip balm.  I eagerly volunteered the use of the beeswax I collected from the hives last summer.  During hive inspections, I scrape off burr comb.  Burr comb is comb built where the beekeeper doesn't want it (typically between the boxes/supers).  A scrape here and there ends up to be a lot of wax over the course of a season.  I bring a lot of this wax, in addition to my bee equipment, to classrooms in the school district where I work.  The kids loving seeing, feeling, and smelling the wax.  I teach students about pollination, importance of bees, and how they can help the bees.

When capturing this beeswax, the occasional bee gets captured, along with pollen, stray eggs, larvae etc.  At times I am not so agile while working with the bees, sweating underneath my beesuit, so bits of wax fall to the ground and dirt clings to any remaining nectar or honey on the comb.  Needless to say, the wax isn't 100% clean, so one must render the wax so it is pure and usable.  I plan to make a solar wax melter this summer but I wanted to try rendering the wax using the traditional stovetop method.  Knowing what the process is really like, could impact the design of the wax melter.  With a pot and pan donation from two friends, an old laundry sack, scrap wood, scrap fabric, and screen from our old windows,  I rendered the wax.  I will give a brief overview of what I did, but if you want more details, check out this website.

This pot is filled with all of the beeswax and water.  Notice the different colors of wax.

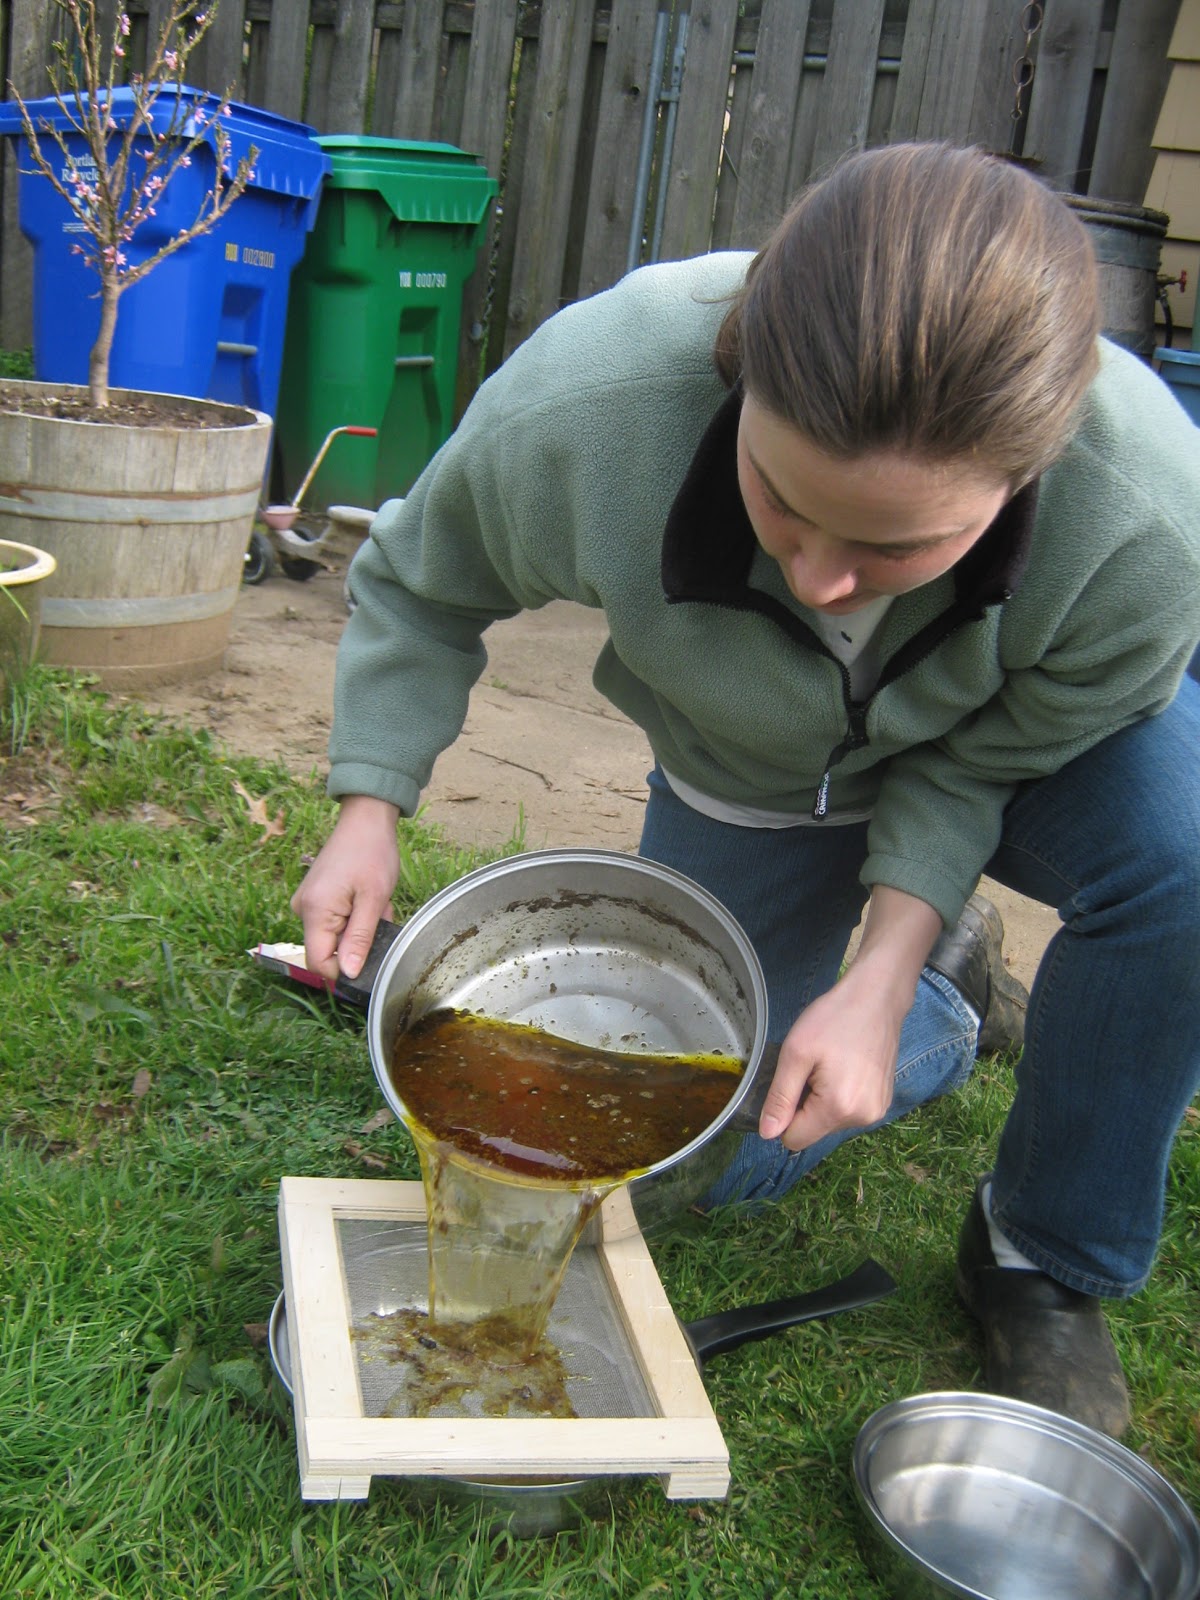
After boiling the wax and water for 30 minutes, it is strained through a screen to catch all of the debris. 

Here is all the debris that was captured.  I spread it out on cardboard to dry.  This is good fire starter so I set it aside to use when we go camping.  The screen came from old windows that we replaced 2 years ago.  The screen is sandwiched between two boards.  If you have ever played with candles, you know how difficult wax is to remove off stuff.  Simple solution: pour boiling water on everything and swish it around.  I do all of the wax pouring and cleaning outside in the grass because I am accident-prone and don't want wax in my kitchen.  It's also important to note that I will not be using these pots for anything else.  It's nearly impossible to get rid of all the wax.  Stainless Steel is preferred.

After the wax and water is poured through the screen, I let the solution cool.  The wax will float to the top and form one huge wax pancake.  The honey/water liquid is discarded.  There are still bits of dirt and debris in the wax so we melt it again (but with no water this time) and...

pour it through an even finer filter such as cheese cloth, nylon, etc.  This is an old mesh laundry bag.  I am pouring the wax into a waxed orange juice carton because the wax won't stick to the carton---making it easier to remove. 


After removing the wax from the carton, I noticed the wax still had brown specks in it.  I decided to melt it again and strain it through a piece of scrap fabric with a higher thread count than the mesh bag.  First I chunked up the wax and melted it again on the stove. 

Then I poured it through the fabric.  Big tip here: don't use small milk cartons.  They are too small.  Because I was using a high thread count fabric, the wax took longer to strain.  I had an overflow of wax that got all over the pavement.  Thankfully I was able to scrape it off the pavement with a razor blade and set it aside for melting at a later time.
Here are the final chunks of beeswax stacked on top of each other!  They have such a beautiful color, and they smell like honey!!


Lip Balm
Recipe:
1 cup (225 g) shredded beeswax 
14 oz coconut oil
5 T (100 g) honey
5 T pure vanilla extract

Heat the wax in a saucepan over low heat to 150 degrees.  In a separate saucepan, heat the oil to the same temperature.  When both are heated to the proper temperature, add the coconut oil to the beeswax, remove the pan from heat, and stir steadily until well blended.  Then add the honey and the vanilla extract, and continue to stir until well blended.  Pour into tubes or tubs, allow to cool overnight, and then cap the containers and store at room temperature, out of direct sunlight.    **Fills 100, .15-ounce lip-balm tubes**
(This recipe wax taken from The Backyard Beekeeper by: Kim Flottum)


I reduced this recipe by half because we only had about 50 containers to put the lip balm in.  Our containers ranged from aluminum tins, plastic tubes, plastic containers, and reused glass makeup containers.  In the end, we made the recipe twice.  The first time the mixture was a little bit heavy on the oil and it kept separating.  We stirred before pouring, but the extract and honey mixture would still settle to the bottom.  You can see this separation in the picture.  For the first batch we measured 1/2 cup shredded beeswax, whereas the second batch we decided to weigh it in grams.  One of the measurements listed in this recipe is incorrect because 1/2 cup shredded beeswax is only about 6 grams.  Needless to say, we ended up using the rest of the beeswax for the second batch (113 grams---one gram extra).  The mixture still separated the second time.  The dark colored lip balm doesn't have as much wax, but it has a strong rum flavor.  I used my homemade vanilla extract which was made with rum rather than vodka.  This was a very interesting experiment.  I will add more comments when I begin using the lip balm.  If any of you readers are thinking of making lip balm, try a different recipe.  The beeswax measurement in this recipe is definitely wrong and I don't think the separation should happen....


About this blog

A weekly update on our adventures of trying to be more self-sufficient by using resources wisely. We explore a variety of topics that most broadly fit in the "Homesteading" category, i.e. beekeeping, organic gardening, edible landscaping/fruit forest, food preservation/canning, woodworking, soap-making, and environmental stewardship.

Search My Blog

I've been featured on:


Followers

Facebook

Contact Form

Name

Email *

Message *

Powered by Blogger.