Simply Resourceful

Simple ways to be more conscious about how we use our resources.

How to Make a Christmas Wreath


Making a holiday wreath is a craft that I have enjoyed doing for three years.  I enjoy it so much that I made one for a friend this year!  To make a wreath, you need: 

  • A solid ring; it has to be a sturdy ring (sorry a clothes hanger won't work because it's too pliable).  I purchased a 12 inch non-bendable ring at a fabric store for a little under $3.00.
  • Florists wire.  One spool of wire will make several wreaths.  Cost: ~$3.00
  • Greenery boughs
  • Decorative items such as pine cones, holly, ornaments, bows, etc.
To keep the costs low, I reuse the ring and wire.  After the holiday season, the wire is wound onto a piece of scrap wood and packed away for the following year.  I also trim the pine tree in our yard (and neighbor's yard) when it's time to make wreaths rather than trimming them in the summer or fall.  I also use the pine boughs that are removed from the base of the Christmas tree.  Christmas tree lots also have piles of boughs.  The pine cones I use are picked off the ground in our yard and the holly branch was pruned from a bush in a nearby park.  The holly berries are plastic berries that I can reuse next year.  For wreath making instructions, watch this video:


Moving Bee Hives and Saying Goodbye

Today one of our beehives was adopted by a new beekeeper because Jon received a job in West Virginia!  We have been searching for a job closer to our families in Wisconsin and Minnesota so a move has been planned for about a year now.  Work at the new office begins at the end of January so we are getting our home ready to sell and looking for a new place.

We have been discussing at length what to do with the bees in the event that we move.  At first I thought I would put them in the back of a rented pickup and drive them across the country; but when I considered the resource use for transporting them and the time commitment, I figured it was probably best if they stayed here and I bought new ones wherever we went.  I also didn't want to risk spreading diseases or exposing the colonies to new diseases (if disease exists which is hard to know sometimes without lab testing).  There's no guarantee if they would even survive past spring since it's early winter, so a lot of work could be invested with a depressing result.  So...I posted my hives on a bee list serve, Craigslist, and talked with a few friends.  In only a few days I had a few bites.  Here's how we transported the first hive:

I shoved the entrance reducer in the opening as far as I could without it getting stuck in there.  Then we wrapped a few layers of duct tape around the hive to hold the entrance reducer in place.  The buyers were only transporting them about 4 miles away so there wasn't a concern of a lack of air flow.  If the hives were being transported in the summer, then we would place window screening across the front.  Both hives have screened bottom boards to help provide ventilation. 

It was 34 degrees when the hive was moved.  The hives haven't been opened since September so everything is sealed together really well with the bee propolysis.  For added precaution, duct tape sealed the crack between the 2 boxes and boards were screwed on both sides to help keep the supers from shifting. 

The hive was quickly loaded into the back of a truck and strapped down.  Moving the hive was actually pretty simple.  I think moving them in the winter when the population is small, the supers are sealed together really well, and the bees are less active is the best time of year to relocate a hive.  

And now only one hive rests in the backyard waiting for the next owner.  It is sad to look out my window and see the empty spot.  I will never see that hive again, but I know that it is in good hands (see pic below).  This is what happens when a move takes place----decisions must be made and the results are permanent.  I am sad to part with my bees, my friends, our home, and all the fine details that have made our life here special.   I will shed a few tears once the second hive is gone, our entire home is in a moving van, and last minute hugs are given away; but I continue to remind myself that life goes on and an adventure is out there waiting for us!  Our family will find a country home with a perfect bee hive location and new faces will greet us.  We will continue our homesteading adventures wherever we go and continue sharing it with our friends, family, and surrounding community.  

This is where the hive now rests.  It looks so cozy among the chickens in this suburban lot.  


Resourceful Gift Wrapping

There are many ways to be resourceful during the holidays.  Here are a few things I do every year to reduce resources and save money.  Reuse old wrapping paper is the first step.  I know this sounds silly, but it makes sense.  I avoid saving ripped pieces and those with warn spots from tape.  Now that we have a 3 year old, it's nearly impossible to save paper since he's an overzealous gift opener, but I manage to save small pieces from the large presents.

Make your own gift tags from old cards. My Mom taught me this years ago.  Before greeting cards go to the recycling bin, I cut out the pictures with a pinking scissors (cuts zig zags).  A hole is punched in the corner and attached to the gift with a ribbon.

Ribbon can be used multiple times before it is doomed for the trash.  I have not bought ribbon in 5 years and this is how much I still have.  

Comics are fun and colorful and perfect for birthday gifts.

Very few people use paper maps in their vehicles with the convenience of GPS systems and phones so why not use the maps as wrapping paper before the recycling bin?  At the National Weather Service where my husband works, he brings home stacks of weather maps that are created daily and then recycled.  They are big sheets of paper with weather patterns drawn all over them.  This paper makes a unique wrapping.

Reuse gift bags.  This seems like a very obvious one, but I am surprised how many times I have seen people throw them away at parties.  An even better option is using cloth bags----the bag is also given as a gift.  My friend had pictures of her children printed on canvas bags that state,
"Please take note!  Always bring a tote!"


Reuse old tissue paper.  This pile is only a smidgen of what I actually have.  If the paper isn't too wrinkled, I just flatten it and put it in my box.  If it's really wrinkled, I iron it with the residual heat from the iron after I turn it off from ironing clothes.  I have used tissue paper for padding in a gift, but I have also used it as wrapping paper on the outside of a package. 


Send a postcard and save on postage.  I will use the front of an old Christmas and birthday card and size them to a postcard.  Instead of spending $.44, you spend $.29.  The minimum size of a postcard is 3.5 x 5 inches and the maximum size is 4.25 x 6 inches.


Harvesting Walnuts

This post is being published 2 months after I typed everything up.  I am a bit embarrassed to publish something that went totally wrong, but hey, someone will learn from my mistakes, and others may have years of experience harvesting walnuts and could post some advice in the comments section!  So here goes the hesitant post:

I have absolutely no idea how to harvest walnuts.  Every online source I find leads me in a different direction, and the people I talk to all have varying opinions on this matter.  So here goes a mish mash of tiral and error when trying to harvest walnuts this fall.  Both trials ended with no success.  If you have a sure-way of harvesting walnuts, please let me know.  I'd like to try again next year!

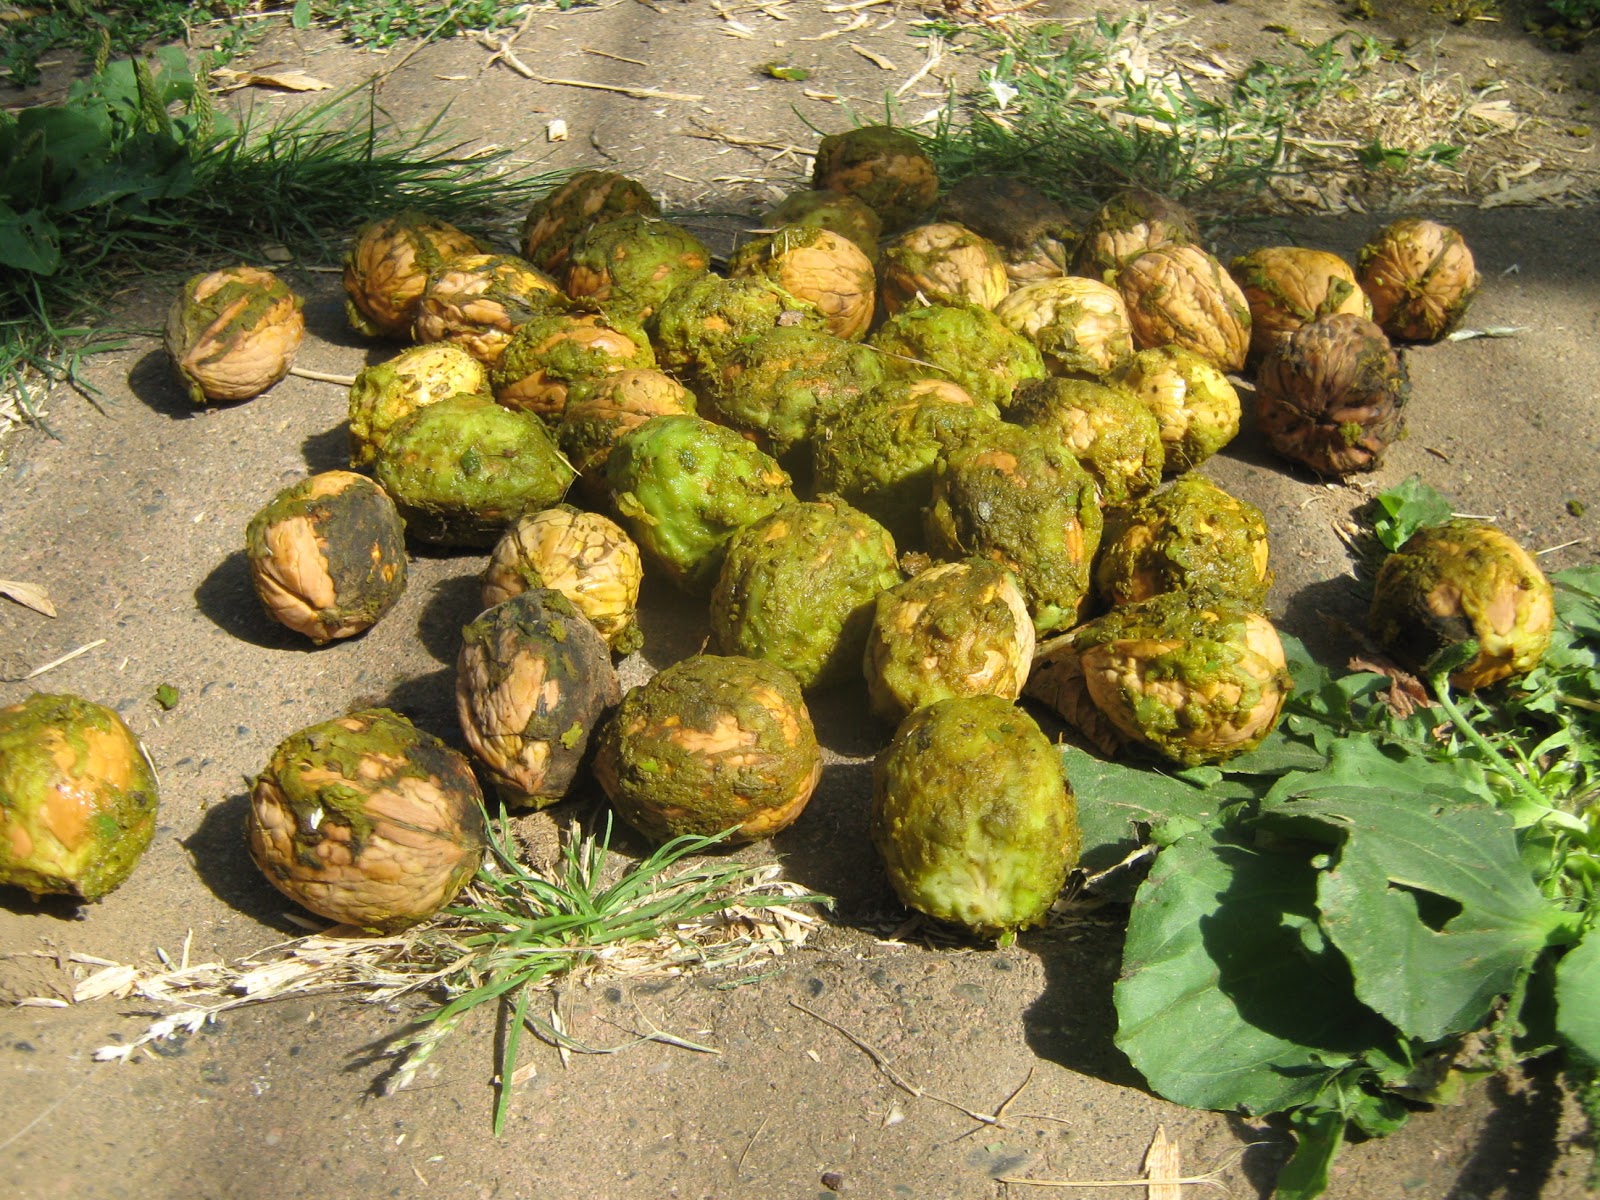
*All references say to collect the nuts after the tree drops them; meaning, don't pick them directly from the tree.  Living in an urban setting means squirrels, which means very few walnuts on the ground for humans.  My selection was very limited.

*One thing is for certain, walnuts have a very strong dye that discolors everything, so make sure you're wearing gloves, old clothes, and cracking them in a location that can stay permanently discolored for a long time. 

*Dispose walnut hulls in the trash or away from your garden.  Walnuts contain a toxin that can damage the soil and future plant growth.


This next section is the part I'm uncertain about.  Some people wait until the shell is black and falls away from the nut.  I read that brown shells indicate decomposing which creates heat and cooks the nut.  Further in the reading it said to remove the green or mostly green shells.  So...I decided to go with the advice of removing the green shell.  There are many ways to remove the green shell.  A walnut huller is ideal or a cement mixer with a combination of nuts, water and gravel.  I don't have either so I tried shelling them using a hammer to crack the shell and then using my fingers to pry off the remaining shell.  This was a lot of work, and in the process, I ripped a tiny hole in the glove which leaked that dye into my glove discoloring my hand and thumb nail for weeks!  I also tried the hammer method followed by a grout mixer on the end of a drill agitating the nuts in a bucket full of water.  This method was a lot faster and it saved my gloves from holes.  If I discover it's worth harvesting walnuts, I will designate an old pair of work gloves for this task instead of using these disposable ones. 

(Using a hammer, I broke open the green shell.  I did this on a tuft of grass on top of cement to soften the blow of the hammer on the concrete.)

(After the green shell is removed.)

(A drill with a grout mixture attachment)

(Removing skins with the help of the grout mixer and some water.)

After removing as much of the green shell as I could, I rinsed the nuts with water in a bucket, swirling the nuts around until the water was almost clear.  


Then I put the nuts in an old onion sack and hung them under the eaves by our back door to dry.  They are to dry in a warm location (out of the sun) for about 2 weeks (some say 3 or 4 days) or until the shell easily breaks.  Nuts will spoil if the temperature exceeds 105 degrees. 


The results: 

(I decided to crack the first batch of nuts after 1 week and they were all shriveled up but still rubbery.)

(Some of the nuts actually looked burnt.)

(These were some of the good-looking nuts that were still a little rubbery and needed to harden.)

(Here's the inside of the shell---you can see the four chambers really well.  Kinda cool!)

(The inside of a nut, still wet.)


(After a few days of drying the nuts on a towel, the nuts that actually looked pretty edible, dried up into raisin-like nuts.  So...we did not have any success with harvesting walnuts using the above methods.  We still had fun though and learned a lot!)

I didn't find any black nuts on the ground this fall because the squirrels got to them first; or perhaps I should collect the green nuts and let them blacken in a dark place before they are shulled?   I have no clue, but I'll try again next year!  If you have any advice, please post in the comments section!  : )


City of Portland Residential Composting Program

Contrary to what many people think, the City or Portland is not a very green city, but compared to most, we have made some great strides in the right direction.  Along with banning plastic bags, the city has now expanded its composting program to include all residents.  Since 2007, businesses have been piloting the program, and now as of October 31, 2011, all residential homes with fewer than 4 units are mandated to participate.  Several years ago I implemented this compost program at three schools in the district I work at, but unfortunately it's still more expensive to pick up compost compared to garbage so the program has not been implemented district-wide.  Schools also use biodegradable bags for lining trash cans.  The bags cost $.80 each!!  The unique part of this program is that all food products are accepted including meat, bones, dairy, and bread along with vegetable and fruit scraps.  Some food soiled cardboard and paper products are also accepted including napkins and pizza boxes.  My family doesn't eat much meat so we won't be adding much of anything to our compost roll cart since I compost food scraps in the backyard pile and we rarely waste food.  Although, cake scraps left on attendee's plates from my son's birthday party went into the compost roll cart.  With weekly compost pickup at the curb, those with weekly garbage service in the past will now have every-other-week garbage service.

I have heard a lot of people him and haw about "another thing to remember to do," but I think it's great!  Residents are being forced to recycle and compost because their garbage is getting picked up less frequently.  If anything, folks will become more aware how much food they are throwing out and reconsider their purchasing decisions with excess packaging.  I have talked with friends who have weekly garbage pick ups. They are worried they will have stinky garbage piling up in their homes because of fewer pickups.  Several friends have come to me with recycling and bulk purchasing questions.  It's great to see people look at the fine print and make some lifestyle changes.  One friend was ecstatic about the compost program because, "Now the entire family will have to get on-board with recycling!!"

Where does all of the food waste go you may ask?  It is taken to Nature's Needs, a compost facility in North Plains, OR.  The compost facility is located 27 miles from my house, whereas the Arlington landfill is 150 miles away.  A commercial compost facility grinds up the food and yard debris scraps, super-heats it to kill potential harmful bacteria, and then sells it to local nurseries and residents as finished compost.  Instead of food and yard debris emitting methane gas into the atmosphere just sitting in a landfill, it is now being turned into nutrient-rich compost for local gardens and parks.

Each resident is given a compost bucket like this one to place in their kitchen for food scrap collection.  This bucket is then emptied into their green yard debris roll cart to be placed at the curb for pickup.

This is the tray dumping line at one of the elementary schools I work at where they compost all food scraps.  Students pour excess milk into a bucket, recycle the milk carton, throw away plastic and foil in the garbage can, and then toss all food scraps into the green bin.  Posters hanging from a PVC pipe show what to put into each receptacle.

Here's our backyard set-up:  We have a 20 gallon garbage can that is picked up once/month, a green yard debris & compost roll cart picked up about every 3 months, and a blue recycling roll cart picked up once/month.


Homemade Shampoo

Another step to simply my life and make it more chemical-free, I decided to make my own shampoo.  Surprisingly I found a lot of information about this, here's the recipe I decided to use:

Shampoo Recipe:
·         One quart water
·         Herbs
·         4 ounces castile soap flakes
Bring the water to a boil. Turn off the heat and pour over herbs.  Steep at least 20 minutes.  Strain herbs & pour tea over the soap flakes. Stir until the soap flakes dissolve. Once the mixture has cooled, store it in a bottle.

On the left is 4 ounces of shredded castile soap.  Shredding the soap is important because it will dissolve easily in the water.  On the right is 4 grams of lavender which was about 1/8 cup.  Most recipes I found didn't specify how much herbs to use so I used up all the leftover lavender from 3 years ago.  In the end, I found it to be the perfect amount. 

I forgot to take a picture of the next step, but it's pretty straight forward: pour boiling water over the lavender flowers.  After the lavender steeped in the boiling water for 20 minutes, I strained out the lavender buds using a funnel with a cloth filter.  A strainer would do just fine, but I don't have one. 


 After the lavender buds are strained, I add the shredded castile soap.  Notice I am using a wooden spoon to help dissolve the soap.  This is the same wooden spoon I use for making soap--it is not used for food.  If you don't have a designated wooden soap spoon, then I suggest using a plastic or metal spoon. 

Once all of the soap flakes are dissolved (be patient, this make take 15 minutes), pour into containers.  I used empty bottles I had in the cupboard.  I would like to use glass instead of plastic but I have this horrifying image of broken glass in the batch tub.  Homemade shampoo has a water consistency at first, but give it a few weeks and it will thicken up.  In the meantime though, use a small plastic cup (I used the cap from a Pepto Bismol container), fill it up half way, and then dump it over your head.

How well does it work?  GREAT!!  I was able to use this homemade shampoo for a couple months before I needed a boost of Nature's Path brand every 2 weeks.  The homemade stuff doesn't thoroughly strip the hair like the commercial stuff, so I need an extra boost every now and then.  And for those who are curious,  I take a shower every other day.  

What about homemade conditioner?  Don't worry, I will be making that once my store-boughten bottles are gone.  Stay tuned!  

Below are different hair types and recommended herbs to use:
Normal Hair: Horsetail, red clover, crushed lavender flowers, rosemary
        -if blond:  chamomile & marigold
Oily: Rosemary, mint, nettle leaves, sage, crushed lavender flowers, indigo root, burdock, tea tree leaves, lemon grass, orris root, comfrey leaves
       -add to shampoo base: jojoba oil
Dry: Comfrey root or leaf, red clover, crushed orange flowers, crushed lavender flowers, elder flowers,
        -add to shampoo base:  jojoba oil  
        -if blond: chamomile & marigold
Light Hair: Use light colored herbs like marigold & chamomile,
Dark Hair: Rosemary
Gray Hair: Nettle, sage, rosemary, plus any herbs recommended for your hair type
Make hair bright: Chamomile
Make hair shiny: Rosemary
Hair loss: Rosemary, crushed lavender leaves, tea tree leaves, sage, nettle, basil
Dandruff: Nettle, comfrey leaves, birch and/or white willow barks, peppermint, lemongrass


Vanilla & Almond Extract

If you're an avid baker like me, then you use a lot of vanilla extract throughout the year.  In the past I would bring my own bottle to the store and fill it up in the bulk section, but that is expensive; and imitation vanilla....nope, not in this house!  One day I decided to make my own!  Here's how you do it:

To make vanilla extract, you will need:
12 ounces of vodka or rum
2 vanilla beans (sliced and cut into 1-2 inch pieces)

*I recommend going to a food co-op or natural food store to purchase the vanilla beans in the bulk section.  You will pay about $2.50 per bean.  The beans should be long and somewhat moist with a strong aroma.  If you go to a regular grocery store, they are typically sold in a skinny plastic tube and they are much shorter and somewhat dry. *

In a bottle, add the sliced and cut vanilla beans to the alcohol.  Every couple of days, shake the bottle.  Store the bottle in a dark place.  After a couple of months, the extract is ready to use.  I've read everywhere from 6 weeks to 6 months for fermentation.  The longer the mixture ferments, the stronger the flavor.  The beans can always be kept in the jar(s) to intensify the flavor even when the fermentation is finished.  Some people keep adding more alcohol to the beans and continue the fermentation process because the beans still have more "juice" left.

I have made vanilla extract with vodka and rum.  I prefer the vodka because the rum smell never seems to go away no matter how long the extract ferments.  Just a personal preference, that's all.

I enjoy this extract so much, that I give it away as gifts!  It sounds silly, but some people really do enjoy these kind of quirky practical gifts.  I purchased one dozen, 4 ounce jars from Mountain Rose Herbs located in Eugene, OR.  These are the perfect size for gifts.  To give it that added touch, I made cute labels.

To make almond extract, you will need
2 cups brandy or vodka
4 oz. peeled, blanched almonds.

1. To blanch almonds, pour boiling water over the almonds in a bowl.  The water should cover all of the almonds.  Let the almonds sit for 1 minute, no longer.  Drain the hot water, rinse the almonds with cold water, and rinse again.  Pat dry and slip the skins off.

2. After the almonds are blanched, grind them up very small. (I used a food processor.)

3. Add the alcohol and ground almonds to a bottle.  Shake the jar every couple of days and store in a dark place.  The amount of time needed for the fermentation is the same that I wrote about vanilla extract.

The bottle on the left is vanilla extract and the bottle on the left is almond extract.  You can see the almonds and vanilla beans sitting on the bottom of the bottles. 


These are the 4 oz bottles that I use for gifts.  

These are vanilla beans.  The bottom bean is 7.5 inches long!

These are the labels I attach to the jars for gifts. 


About this blog

A weekly update on our adventures of trying to be more self-sufficient by using resources wisely. We explore a variety of topics that most broadly fit in the "Homesteading" category, i.e. beekeeping, organic gardening, edible landscaping/fruit forest, food preservation/canning, woodworking, soap-making, and environmental stewardship.

Search My Blog

I've been featured on:


Followers

Facebook

Contact Form

Name

Email *

Message *

Powered by Blogger.