Simply Resourceful

Simple ways to be more conscious about how we use our resources.

Homemade Conditioner

After using my homemade shampoo for about 6 months, I decided to try homemade conditioner.  I found a random assortment of recipes online and decided to give two recipes a try.  I didn't keep track of where the recipes come from, otherwise I would give credit to those who originally provided me the idea!

Recipe 1:  
Vinegar Rinse:
4 cups very hot water
3/4 cup vinegar
~2 T each dried rosemary & chamomile

Tie the herbs in a cheescloth bag and combine with other ingredients in a bowl.  Cover and let steep overnight.  In the morning, remove the herb bag.  To use, work in up to a cup of the vinegar after you shampoo and rinse well.

I use 1/2 cup vinegar and that's enough for me.  Surprisingly my hair doesn't smell like vinegar!  I am really surprised at how tangle-free my hair is immediately after the shower and how soft it feels!

Everything is ready to combine...

Steep the herbs...

In the morning I add the cool mixture into an empty dishsoap bottle and store in the shower.

Recipe 2:
1 1/3 cups water
Xanthan gum (1/2 tsp for gel; 1/4 tsp for conditioner)
Guar gum (1/2 tsp for gel; 1/4 tsp for conditioner)
2 tsp. oil (canola, olive, jojoba)
Scents (optional)

I used a clear mason jar when mixing everything so I could see the process.  I then transferred the finished product into an old conditioner bottle. 

Instructions: Measure the water into the jar and sprinkle the gums into the jar, shaking vigorously after each sprinkle to avoid clumps.  If you get clumps, smash them with a utensil against the side of the jar to break them up.  After I finished everything, I removed the few remaining clumps.  Next, add the oil and shake the jar to incorporate it really well.  You want it mixed in well enough so you don't see a layer of oil sitting on the top.  

*Adjust the oil content to your liking.  If you find it too oily, reduce the oil amount; more if you have dry hair. 


Homemade Vinegar


I attended a vinegar making class at the Hollywood Library on Oct. 23rd.  Author, Jean Johnson, of Hippie kitchen : a measurefree vegetarian cookbook taught the class.  She also has a blog: Measure Free Hippie Cook.  Jean is one of those people who light up the room.  She spoke with enthusiasm and inspired everyone!  I sum up a lot of what I learned from the class below:

-To make homemade vinegar, you need a mother culture.  This "mother" will multiply in your solution and you can divide it whenever you start another batch (kinda like sour dough starter).  Only a speck of "mother" is enough to inoculate an entire jar. Jean mentioned that when she was a young girl (in the 60's), all vinegar purchased at the store had "mother" in it.  She remembers seeing the hazy, filmy, layer resting on the bottom of the jug.  When pasteurization became wide-spread, the "mothers" were killed under the high heat.  Each attendee at the class was given a "mother" to start their own vinegar at home.  If you don't know someone with homemade vinegar, then you can get some mother from unpasteurized vinegar from the grocery store.

-To make vinegar, you only need peelings and cores from fruit.  Apple, pear, and pineapple peelings are excellent.  Since I have only made vinegar with pears and apples, I don't have an inclusive list of fruit, sorry.

-Just to be on the safe side, don't use homemade vinegar for canning or preserving.  Botulism is not something to mess with, and when pickling, the acidity levels need to be spot on!

-Once the vinegar is to your liking, you can add raspberries, herbs, and other flavorings.  I haven't done this, but I suppose you would add the fruit or herb and let it marinate for a few weeks.

-You can use the vinegar for cooking and cleaning.

How to make vinegar: 
-Sterilize the jar you will be using.  Any jar will do, but select a jar that will leave about a 1 inch head space when full.
-Add fruit peelings and cores.  Do not include bruises or wormy spots---they can taint the flavor.
-Add enough water to cover the fruit and then some.
-Add the "mother" to the jar.
-Add sugar to the jar if you prefer.  Sugar will speed up the fermentation process but it's not necessary.  The sugar in the fruit should be enough.  The sugar will probably add a little flavor too.
-Cover the jar with cheesecloth and put a rubber band around the rim.  To keep fruit flies out, be sure to overlap your cheesecloth layers or use a t-shirt if you don't have cheesecloth.  Airflow is important here---without it, you can't make vinegar.
-Set the jar in a dark place where there is adequate airflow with temperatures between 65-80 degrees.  I leave mine on the counter behind my mixer because I don't have any other place in my house that is out of the way and receives adequate air flow.
-When the fruit darkens (about 3-4 weeks), remove the fruit and let the mixture sit with "mother" all alone.
-When is the vinegar finished and ready to use?  That all depends on how strong you like your vinegar.  Jean says 6 months or so.  She knows hers is finished by how it tastes.
-Mother can be removed once the vinegar is finished or it can be left in the jar.
-If you remove the mother from the finished vinegar, it can be stored in a mason jar in the refrigerator with a little vinegar in it so it doesn't dry out.

I started out with one apple core and a little mother in a quart mason jar...  

Then I decided to make a large amount of vinegar by using the squished apples from the cider press

Here is the finished vinegar!

This is what the mother looks like.  It's kind of like a Kombucha pad. 


What can I do with vinegar?  I am constantly learning about things I can do with vinegar.  My main use is for cleaning.  I use it on my tile and hardwood floors, countertops, mirrors, windows, walls, etc.  I mix 1/2 cup vinegar with 5 cups warm water.  I always dilute it and it seems to work just fine.  


Ironically, one week before I took the vinegar class, a Yahoo headline was all about vinegar.  I listed the article's uses for vinegar below, but for more detailed information about each item, go here. 
  • Condition hair
  • Kill weeds
  • Remove underarm stains
  • Soften fabrics
  • Remedy sore throats
  • Deter ants
  • Soak sore muscles
  • Freshen air
  • Remove stickers
  • Cure hiccups
  • Clean crusty paintbrushes
  • Dissolve rust
  • Eliminate stale odors
  • Remove mineral deposits
  • Neutralize spice in foods
  • Prolong the life of cut flowers
  • Clean glass, plastic, chrome, and floors
  • Treat fungal infections
  • Tenderize and kill bacteria in meat
  • Open drains and freshen garbage disposals


Making and Bottling Perry (Sparkling Pear Cider)!!

Today we had our first experience bottling wine!  We started our Perry (sparkling pear cider) on September 24th when we gleaned pears from a neighborhood lot that was for sale.  I used a juicer to extract the juice and used the pulp for pear butter.


Perry recipe:
1 gallon pear juice (12-14 pounds)
sugar to 1.060 Specific Gravity (S.G.)    (~1/4 cup/gallon)
1/2 tsp. Pectic Enzyme
3/4 tsp. Energizer
1 Campden, crushed
1 pkg. Champ. yeast
  • In a food grade bucket, add campden to juice to prevent spoilage and browning.  Stir in all other ingredients except yeast.  Cover.  
  • After 24 hours, add yeast.  Cover.
  • Stir daily, check S.G..  When ferment reaches S.G. 1.040 (3-5 days), syphon off wine into a carboy (leave sediment behind).  Attach airlock.
  • When ferment reaches 1.000 (about 3 weeks), syphon off sediment into another carboy.  Reattach airlock.
  • To aid clearing, syphon again in 2 months and again if necessary before bottling.
When ferment is complete, gently stir in 1/4 cup dissolved sugar per gallon.  Bottle in champagne or returnable pop bottles.  Age for 3 months.  Cool and enjoy!

I included some pictures of the process below.  I also included a video of the bottling process: 


Make sure your pears are firm and ripe.  We used Bartlett pears. 

This is what the carboys looked like after sitting for 2 months.  Sediment and dead yeast is at the bottom.  

This is what the jar looks like after syphoning off the wine.

This is how you check for specific gravity (S.G.).

Bottles given to us from our friends.  It's amazing what a simple email brings someone.  We are eternally grateful that we didn't have to purchase bottles.  To remove labels, soak in warm water and use a razor blade.

We invested in this carboy lifter.  These carboys get very heavy and can be difficult to hold.  The clear/white thing is an airlock.  It lets carbon dioxide out but doesn't let anything in.

Before bottling, all supplies need to be sanitized, including the bucket and spigot.  We use a Star San sanitizer solution.

This is the syphoning process.  The wine flows through the plastic tubing from the carboy to the bucket.  When syphoning, you have to be careful that you don't suck up any of the sediment on the bottom...you want a clear wine. 

We added 3/4 cups granulated sugar to our 3.5 gallons of Perry.  The sugar was dissolved before bottling. 

Fill the bottles with wine leaving about a 2 inch head space.  The bottle is dark green so it's hard to see it in the picture. 

The cork is being inserted into the bottle with the help of a floor corker.  We used #9 corks and don't know if they are the correct size for what we bottled.

This is the floor corker we purchased at Portland U-Brew & Pub for ~$60.00.  We chose this corker because it's metal and very sturdy.  Many people recommend a floor corker because it's less cumbersome than the hand corkers.  

3.5 gallons yielded 16 bottles and 2 grolsch bottles. 

This is our first year making wine and we have a few questions.  If you have advice, please submit in the comments section, thanks!

Question 1: How do you know when to cork vs. cap the bottles?  Does it matter?  
Question 2: Is it safe to reuse bottles from the grocery store or does it depend on what you're bottling?
Question 3: How do you know what size cork to use?
Question 4: Can wine ever really spoil?  I've always been told that wine gets better with age, but isn't there a chance that the cork could fail and potentially leach bacteria in the bottle?  
Question 5: How do you get bottles dry inside?  I washed the bottles with warm soapy water and after 4 days, some of the bottles were still full of condensation.  I don't have a wine rack dryer---would that do the trick?  Some bottles dried really quickly and others never completely dried.  I noticed the bottles with thicker glass tended not to dry.


Junk Mail


Ahh...those two dreaded words...Junk Mail!  Most people don't give it much thought to toss the daily junk mail into the recycle bin (I hope not the trash) and carry on with their day.  Don't get me wrong, I LOVE getting the mail.  In fact, I wouldn't mind being a mail courier (as long as I could walk door to door)! Removing myself from junk mail went from a daily ritual for me to an obsession.  Everywhere I live, I am proactive on removing myself from mailing lists and redirecting mail from previous residents.  I have lived in my current home for almost 4 years and decided to track all the mail I receive for 7 months.  Here are the results:


Mail from friends or mail I expected (bills, presents, subscriptions, etc.): 93
Mail I did not order (junk mail) and did not want81
Mail without an address printed (can't remove from mailing lists): 10
Previous resident: 5

On average, I receive ~1.13 pieces of mail each day.
(214 (total number of days in a 7 month period including weekends and govt. holidays)/189 (total pieces of mail))

Junk mail has a huge impact on the natural environment because it uses paper, ink, energy to print the mailings, gasoline to transport the mailings, and not to mention people's time to get it to my home.  Some could argue that without junk mail, postage rates would rise.  I personally think that $.44 to send a letter thousands of miles away in less than 3 days is rather cheap.

This is what I do when I receive mail that I don't want:
1. Call the business and speak to a customer service representative using the phone number on the mailing.
2. Find the business on the Internet and find the "contact us" link and find a phone number or email.  Often times when searching for an email address, there will be "Remove from Mailing List" option which ensures efficient removal.

What I do when I receive mail from a previous tenant:
1. Call the business if there is a phone number on the outside of the envelope or find the company information on the Internet (I never open another person's mail).
2. Write on the envelope "Return to Sender, Resident No Longer Lives at This Address" and place it in the return mail.  If you put this in the mailbox at your house, it reminds the mail courier to double-check the name next time.  Years ago when I rented a house in college, I remember compiling a stack of mail a foot tall and bundling them together with a note attached stating, "These people don't live here anymore please return to sender."  I never received a piece of mail without my name on it ever again at that address---what a relief!

When I receive mail without my address printed on it, I know that it was a mailing sent to everyone in the community.  In particular I receive catalogs for colleges in the area.  Being the proactive person that I am, I write to each of these businesses and express my opinion about junk mail, its environmental footprint, and cost to the business for sending mail to those who don't want it.  I have surprisingly received many replies from these businesses.  Many have said that their board of directors (or whoever) have been looking at the cost for the catalogs and are reconsidering these mass mailings.  

There are a lot of websites out there that can help remove you from mass-marketing lists.  One that I have registered with is DirectMail.com.  This website removes you from most mass-marketing lists and it is free. Some of these mailing lists removals require your social security number but this one does not.

A New Year and A New Home

Happy 2012!!  This year is going to fly by quickly with all of the changes our family has ahead of us!  As I already mentioned in a previous blog post, my family is moving 2,500 miles for a job promotion, a larger living space, and to be closer to family.  If you have moved across the country, then you know how busy December was for us.  After hours upon hours of searching for homes, and a quick trip to West Virginia, we finally settled on a home and we're in contract.  Whew!  What a whirlwind of emotions and decisions.  One thing is for sure, West Virginia is the mountain state!  I was blown away by the number of homes that were built on the side of "cliffs," but thankfully we found one home that had a bit of acreage, was somewhat flat (relative to everything else), and wasn't in a flood plain.  I included a few pictures below.  The home interior is very beautiful and much larger than we will ever need; but what really sold us was the property.  It's in a quiet country setting with so much open space; although lawn mowing will be a pain until we have some wooly friends to help us out!


There is a miniature barn on the property for storing things.  Unfortunately is was locked when I viewed the home, but I was thrilled to see this small fenced in area behind the barn with a run to the inside.  I'm thinking this might be a good thing to have in the winter for the chickens!


How to Make a Bat House

If you're needing some indoor winter projects, bat houses are quick and easy to make.  When most people think about bats, they conjure up scary stories and cover their heads, but they should really be welcoming them into their yards because bats are a natural pest controller!  A single bat can eat up to 1,000 mosquitoes in one hour!! 


I did a bit of research about bat houses and found a lot of information.  I can't site one particular source because I gleaned information from about a dozen different websites. 


Here are all of the pieces.  I painted everything brown with exterior water-based latex paint.  It is recommended that you use water-based paint because it has less odor than oil-based paints.  A strong paint odor can repel bats.


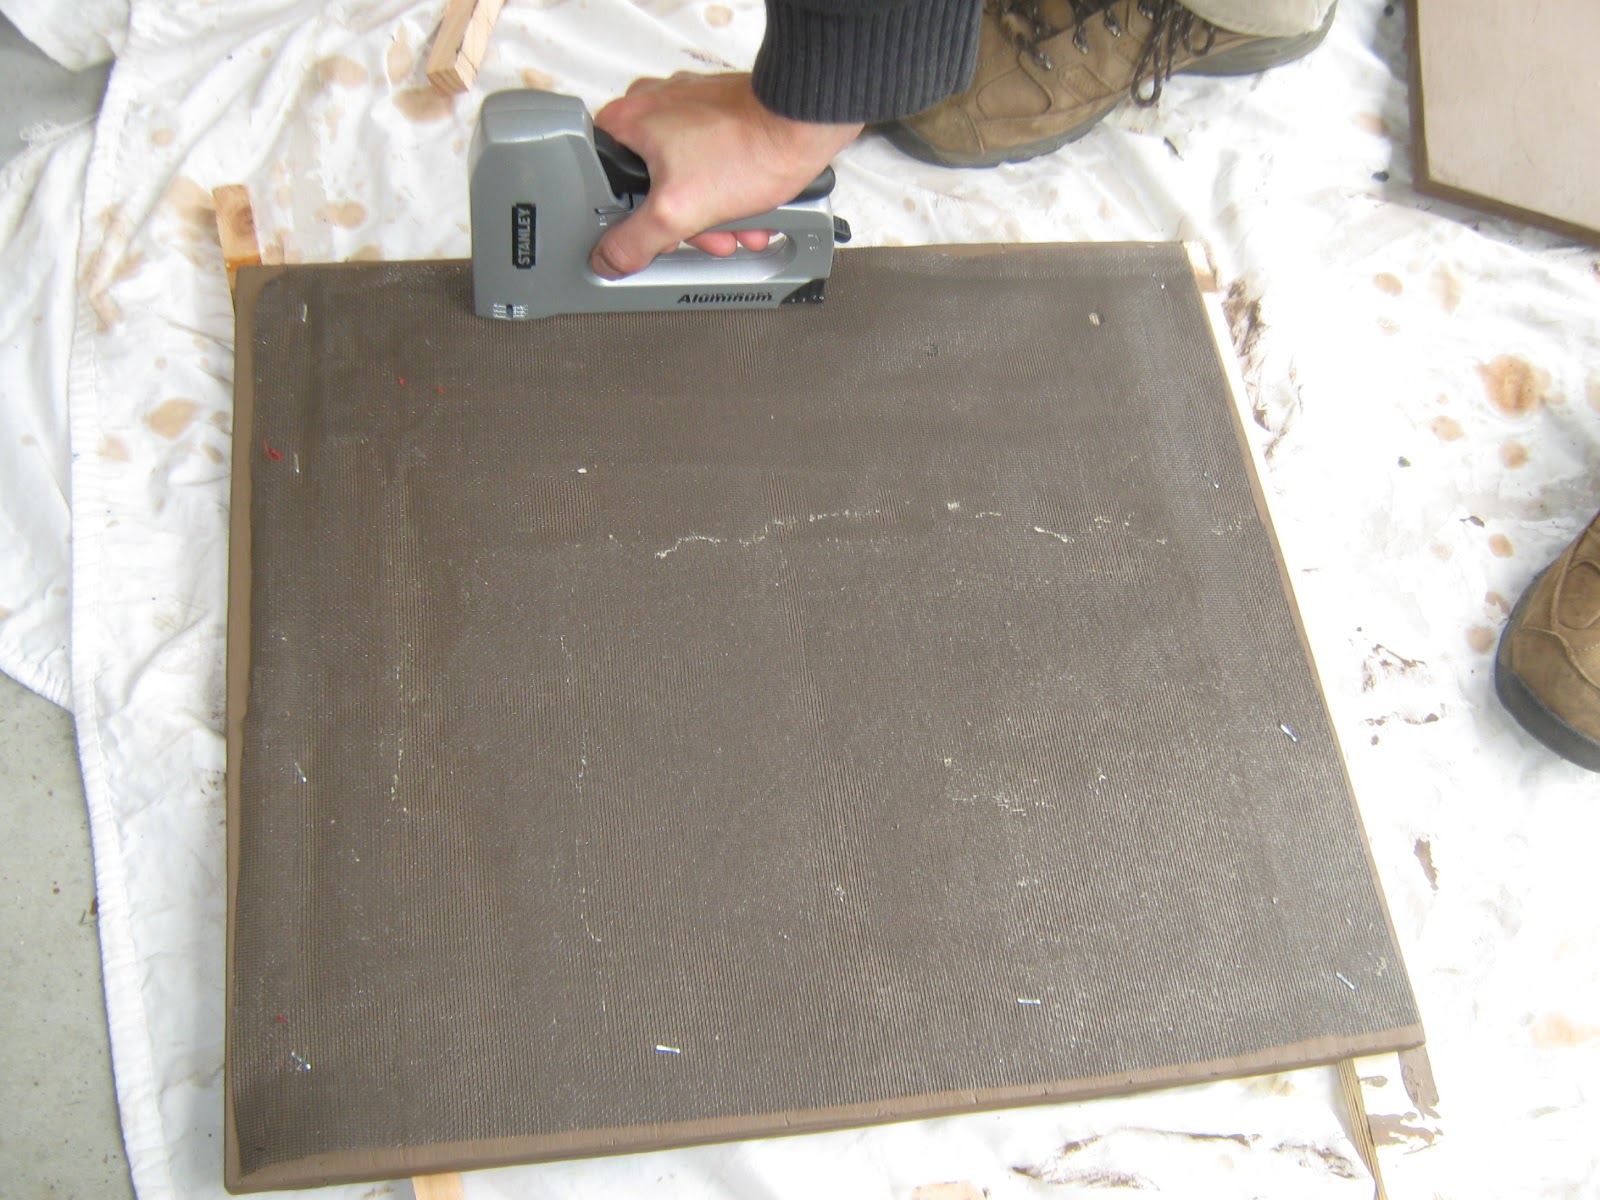
Staple plastic screen or cut grooves on the back board.  Do not use metal screen because it will rust over time.  The screen (or grooves) gives the bats something to cling to. 

Caulk around the edges before attaching the 3/4 inch furring strips.  Attach the furring strips with screws.

Add more caulk on top of the furring strips. You want a tight seal---no light should enter the bat house.

Attach the front pieces leaving a 1/2 inch space between the two boards.  The uncovered space at the bottom of the house is a landing board---very important to have.

The 1/2 inch space allows the bat house to vent---a necessity in every bat house. 

Attach a roof to the house with a minimum 1.5 inch overhang.  This will keep the inside of the house dry.  The finished dimensions of my bat house are 18 x 20 inches.  Bats like a dark and airtight house so I caulked around the edges once more after screwing the house together.  

I added some bat stencils for an extra touch!

Materials: 
  • The wood I used came from scraps leftover from the solar food dehydrator project. 
  • The plastic screen came from an old window that a friend gave me after she used it to make homemade paper. 
  • Brown exterior latex paint came from leftover paint we had in the garage. 
  • Screws---who doesn't have a box of screws lying around.
  • Caulk was found in the garage, leftover from a project years ago.  Surprisingly it wasn't dried up. 

Placement of bat houses: 
  • Bat houses need a minimum of seven hours of morning sunlight.  Bats may not like the sunlight, but they need warmth to raise their young.  They like it to be 80 to 100 degrees in July when they have their young with them. 
  • Place bat houses near a water source if possible.
  • Bats will evacuate the home if it's in a place prone to vandalism where people are shaking or knocking on the box.
  • Do not place along a busy road where dawn and dusk traffic can scare bats.
  • You may place your bat house on a tree, pole, or a building; however, boxes mounted on poles or buildings tend to have a higher occupancy than those mounted on trees. 
  • Be careful when placing them under the eaves of a house---they may not receive enough light.  
  • The bat house should be mounted 15-20 feet above the ground (away from predators).
  • It should not be in a place lit by bright lights at night.
  • Place the bat house where the bats can fly to it freely without obstruction. Obstructions will make their flying difficult and will block the sun’s rays as well. The greatest percentage of occupied houses have flight obstructions no closer than 20 feet away.


Growing Mushrooms on an Urban Lot

Jon really likes mushrooms, but they have to be fresh---not the canned variety.  His first attempt at mushroom growing was this weird "log" that was a dense chunk of sawdust inoculated with mushroom spores.  This variety was shiitake.  It was a fickle thing to work with and went dormant several times which required a rest in the refrigerator followed by a full soaking in a rain water bucket for several days at a time.  The log also had to be sprayed daily with water to keep things moist.  Overall, this method didn't work well for us for unknown reasons.  The mushrooms would blossom and then dry up or rot before they were picked.


The chopsticks are stuck into the "log" so a plastic bag could be placed over everything to create a humid environment without touching the mushrooms. 


After the first attempt at growing mushrooms inside the house, Jon decided to grow mushrooms in the backyard using oak logs we trimmed from our tree this fall.  We ordered 300 dowels from the same place we ordered the inoculated sawdust pile from, Fungi Perfecti.  These wooden dowels are inoculated with shiitake and oyster mushrooms spores and are placed in pre-drilled holes in the oak logs.  If all goes well, these logs should fruit mushrooms for a couple of years.

The inoculated dowels.

Using a rubber mallet, the dowels are pounded into pre-drilled holes.

The dowels were placed about 4 inches apart in a diamond pattern.

This wax came with the dowels.  

Using my beeswax melting pan and pastry brush, I painted wax over each plug, wound, scrape, and cut on the logs to keep bacteria, bugs, and other fungi from going into the logs. 

We then elevated the logs off the ground in a semi-wet environment.  The instructions suggest placing a moist burlap bag over the logs, but in this northwest climate, we're opting for open air because it's damp all winter and spring and too much moisture could potentially be bad.  These logs were placed in the northwest corner of our property next to the house under a magnolia tree.  One thing we have to watch out for are slugs because they love mushrooms...another battle against those pesky creatures!!!


About this blog

A weekly update on our adventures of trying to be more self-sufficient by using resources wisely. We explore a variety of topics that most broadly fit in the "Homesteading" category, i.e. beekeeping, organic gardening, edible landscaping/fruit forest, food preservation/canning, woodworking, soap-making, and environmental stewardship.

Search My Blog

I've been featured on:


Followers

Facebook

Contact Form

Name

Email *

Message *

Powered by Blogger.