Simply Resourceful

Simple ways to be more conscious about how we use our resources.

Making Pear Juice and Pear Butter


I am not someone who collects a lot of gadgets, but this, my friends, is incredible!  This is the Norpro Juicer and Steamer.  This is by far the easiest way to make juice from grapes, pears, apples, etc.  The instruction/recipe booklet even says it can be used for making tomato paste.  You simply put the fruit in the top steamer basket; juice runs into the second pot where it is then siphoned off into jars; and the bottom pot is full of boiling water.  The tiered system works flawlessly, and the fruit mush that is left in the basket can be mushed up and used for other things or just composted.  I made grape juice with this and I didn't even remove the stems.  This system is a time saver!  Below are a few pictures from my pear endeavors!  We used the juice for making wine and the remaining pulp was made into pear butter!

Pears loaded into the steamer.  I only removed the stems and bruised or wormy parts of the fruit.  Pears were cut into quarters.

Here is my basic set-up.  I prop the soup pot on a chair and cake pan to catch the juice. 

I squeeze a little metal clasp to open up the tube and the juice drains into the pot. 

On the left is the steamer full of mushed fruit with little or no juice left.  On the right is an old-fashioned tool for mushing fruit to make sauce.  I don't know what this is called??  Help, anyone?

Using a wooden pestle, the fruit mush is pushed through the holes, leaving behind the seeds and skins. 

Here is the pear mush ready for pear butter!

Pear Butter Recipe: 
8 cups pear pulp
1 orange (rind and juice)
1 lemon (rind and juice)
2 cinnamon sticks
4 whole cloves
1/2 tsp. ground ginger
5 cups sugar

Mix together and cook on stove for about 30 minutes over medium-high heat, bringing to a boil, until mixture is the thickness you like.  Fill pint and half-pint jars and process in water bath for 10 minutes.  Makes ~11 pints

Some people use a crockpot and cook the mixtures for several hours.


Varroa Mite Checks

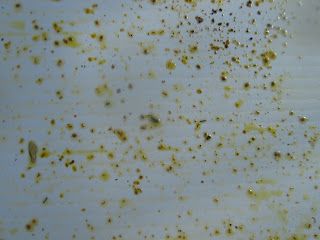
Before I button-up the hives for the fall, I conducted varroa mite checks on my two hives.  Varroa mites are parasites that attach themselves to honeybees and basically live off them until they die.  If mite populations are high, they can quickly deplete a hive, especially in the winter.  Conducting a mite check is very simple: spray a white corrugated sheet of plastic with oil and placed it under the hive for three days.  Honeybees have very good hygiene and they groom the mites off of each other's bodies and the mites simply fall out of the hive and onto the white sheet of plastic. 

The results: 
Blue hive: 113 mites
White hive: 26 mites

These numbers are definitely not good in the fall of the year.  9 times out of 10, disease kills a hive before spring if the colony is not strong enough.  Funny though----I performed a mite check on August 19th, only a month ago, and the mite numbers were 27 & 21.  This is proof how fast these parasites multiply and how quickly they can decimate a hive. 


(When I purchased this hive, it conveniently came with a slot that the mite board could slide into.)

(Pulling the mite board out...)

(This is what the mite board looks like after three days of being under the hive.  On the board there are bee parts, dead spiders, pollen, dirt, earwigs, and mites.)

(In the very center of this picture is a varroa mite.)

(This picture shows what I see up close.  How many mites can you see in this picture?  I see 17!)

(This is what a varroa mite looks like under a microscope....gross...)

There are many ways to treat honeybees with varroa mites.  One method is dusting the bees with powdered sugar to encourage grooming.  I totally intended to do this but forgot the powdered sugar after opening the hive.  I also made mite patties.  These patties are basically 1 cup vegetable shortening mixed with 1/2 cup powdered sugar.  Other beekeepers recommend using Honey-B-Healthy, so I added a capfull of that to the mixture as well.  Mix everything together and place a patty onto waxed paper, face-up on top of the frames in the hive.  The honeybees will want to remove this patty from the hive (and sometimes will eat it), and in the process get it on their bodies which will  encourage grooming.  The patty has oil in it which is also supposed to make it more difficult for the mites to cling to their bodies. Honey-B-Healthy is like "bee medicine" that contains lemongrass and other essential oils.  Unfortunately it also contains sodium laurel sulfate which I didn't realize was in it until after I purchased it.  That additive deserves a blog post all by itself, but it's on my list of "do not have in my house."


In addition to the mite patty I decided to feed the bees.  Most beekeepers give their hives a big dose of sugar water in the fall to make sure the bees have enough food stores for the winter.  My hives did produce some excess honey this year but not enough to extract (that's a messy job for only 5 frames of honey).  I left this honey in the frames and will give it back to the bees in the spring instead of keeping it for myself.  If I had extracted honey, then I would use the honey in the feeder in place of the sugar water that I mixed up.  The picture above shows the feeder being filled with 2 cups sugar dissolved in 2 cups water with 1 tsp. Honey-B-Healthy mixed in.  The bees crawl up through the hole in the center of the feeder and cling to the feeder walls and that plastic cup.

(The feeder lid is now on to keep bees from falling into the syrup.  You may wonder why the inside of the hive cover is black.  It's from the scorching I did in the spring. 

In a few days the feeder will be empty, and in a few weeks I will perform another mite check to see if what I did helped the bees in any way.  Beekeeping for me is like walking a tightrope.  I want to help my colonies survive, thrive, and produce a lot of excess honey, but I also don't want to feed them gallons of sugar water every spring and give them chemicals for disease treatments.  I want to have strong honeybee genetics and produce bees with strong immune systems.  By using chemicals, beekeepers are only producing stronger mites and other diseases.  Am I making sense?  Anyway, I'd be interested to hear other people's perspectives on this so leave your comments below!


Canning Tips

In the past 2 years I have taught a few friends how to can and I always offer a few tips along the way.  If you have some tips you would like to share, please post them in the comment section below!

1. Preparation:  If you plan to can the following day, clean the kitchen the night before.  Have your jars and lids washed and ready to go, or have them in the dishwasher ready to wash.  I find it motivating to wake up and see countertops free of clutter, no dirty dishes, and the canning pot already on the stove.

2. Keep a log: Good record keeping is a must.  I put together a 3-ring binder with labels this past winter.  I can easily find how many pints of tomato soup I can make with 8 pounds of tomatoes without scanning electronic documents, flipping through my recipe box, or looking at scribbles in the margins of my canning book.  This preservation log is a time saver and ensures accuracy.

3. Wear Comfortable Shoes:  This sounds silly, but it is actually really important.  Don't try to mimic the 1950's housewife pictures where women wear dresses and high heels in the kitchen.  I wear my walking shoes and old clothes because spills and splatters do happen.  Boiling water does drip onto my shoes when I'm moving the canning pot lid from one place to another.  I spend hours on my feet everyday and need to give my back proper support with a comfortable pair of walking shoes.

4. Sterilize Extra Jars:  I was just recently thanked by a friend for offering her this advice.  Even though a recipe states 9 pints, always wash a few extra jars.  Recipes waver and you don't want to delay process by 30 minutes because you have to dig out more jars (or go to the store and get more) and wait for the lids to sit in warm water.

5. Give Yourself More Time:  If you have a 5pm BBQ, don't begin peach canning at 2pm.  Canning is supposed to be enjoyable and not under the tight limits of time.

6. Have Plenty of Clean Towels and Washcloths:  There are always spills to wipe up, whether it be water from the canning lid pooling on the stovetop or tomato soup running down the jars.  I always have a pile of clean towels on-hand because I don't want to be washing jar rims with the same washcloth I washed my son's face with.  Before the day is done, there will be towels hanging over the laundry room sink drying from all the spills.

7.  Water Conservation: Let's face it, canning uses a lot of water: washing vegetables, washing jars, soaking lids, blanching, canning pot, washing hands, etc.  I try and redirect as much water as I can to my garden rather than down the sink.  Of course, always wait for the water to return to room temperature before applying to the garden so we don't kill any beneficial bugs or root systems from the boiling water. Through the years I have found two other uses for the boiling water from the canner and blanching pot.  I will pour the boiling water on the jam covered pot and utensils (the easiest way to clean the sticky mess, believe me!).  The second trick is pouring the scalding water down a drain in the house that may be a little slow to help clean out the pipes and get things moving (be sure it's safe if you have PVC pipes and make sure nothing is touching the pipes under the sink).


Since I mentioned tomato soup in two of the above tips, I decided to include my recipe:


1 peck tomatoes (12 pounds)
3 large onions or 6 small
3 peppers
1 small bunch celery (or 4 large stems)

Mix together all of the vegetables in a large soup pot.  Cook over medium-high heat until vegetables are soft, making sure to stir to prevent burning.  When vegetables are soft, puree them using a stick blender or transfer them to a blender for a smooth consistency. Add dry mixture and blend to ensure no lumps.

Dry mixture:
            1 cup sugar
            1 cup flour
            about 1/3 cup table salt


Can and seal: pints, 10 minutes at 5 pounds

Makes about 15 pints. 


***I don't bother removing the skins on my tomatoes because everything gets blended into a puree and I personally don't notice a texture difference.  I also think there's a higher nutritional benefit to leaving the skins on.  If you don't want skins, blanch them...a lot more time though...***


Cider Pressing!

Fall is my favorite time of year, and I can't think of a better way to begin the season than with the smell of freshly picked apples and some apple cider!  To get started, we needed apples, and a lot of them.  Surprisingly enough, the past 4 years we have discovered 2 apple trees within a half mile of our house.  If you know us, we're not shy----we'll ask the homeowner if we can pick their tree if we see apples rotting in their yard.  (If their tree is being picked and there are no apples on the ground, then we won't ask.)  Anyway, apple trees produce fruit every other year so we had to find a new tree this year because unfortunately, home ownership changes hands and one of our trees isn't available this year.  This summer I've been sleuthing the streets, and oddly enough, I found a tree at a school right along my weekly walking route.  I asked my boss if the school district uses chemicals on school grounds and if I could receive permission to pick the tree (to help the groundscrew of course!) and he granted my request and verified that no chemicals are allowed.  He is the facilities manager so receiving permission wasn't very difficult.  At 6:45 the next morning (our son is a rooster!) we picked apples!

(Walking down quiet streets in the early A.M.  Jon is pushing the wheel barrel and ladder and I am pushing Paul and the fruit picker!)

(Here is the very tall apple tree with no apples within reach from the ground.)

(Jon is on a 10 foot tall ladder with the fruit picker almost fully extended.)

(Here is the fruit picker.  It's basically a wire basket attached a rod that can extend.  The top of the wire basket has hooks on one side that helps the picker grasp the top of the fruit or branch to dislodge the fruit.  The foam pad cushions the fruit to prevent bruising.)

(Jon's view from the ladder.)

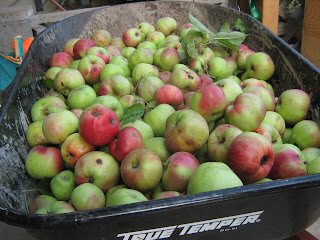
(The wheel barrel at home ready for preserving.  We were told these were McIntosh apples.)

(Here is the Happy Valley Ranch Homesteader Apple Crusher and Press that we purchased from the Portland Homestead Supply Company. )

(While one person turns the big wheel on the right of the press, another person feeds apples into the hopper/crusher which is that black box.  The crushed apples fall below into the basket lined with a mesh bag.)

(A wooden disk sits on top of the mesh bag and a gear is turned to press the apples.  This picture shows what the pile of apples looks like after they have been pressed.)

(Jon is turning the press to smash the apples.  This press is designed using basic physics so not a lot of strength has to be applied.)

(Apple cider!!)

(Half a wheel barrel produced 2 soup pots full of apple cider!  These 2 pots made 11 quart jars after samples!  To can apple cider, bring the cider to a boil soon after pressing.  When it comes to a boil, ladle into sterilized jars.  Process quart jars in water bath for 5 minutes and half gallon jars for 10 minutes. )


(Cider and 2 jars of dehydrated apple slices.)

(Applesauce)

(Apple pie filling)

Does anyone have any ideas on what to do with the apple mush after it comes out of the press?  We filled about 4, 5 gallon buckets full of pressed apple mush.  I was thinking if I had one of those sieves that separates the core and seeds from the good part of the apple that I could make applesauce, but I was wondering if the applesauce would be too dry without the liquid?  Until we find a good solution, we will just put it into the compost. 


About this blog

A weekly update on our adventures of trying to be more self-sufficient by using resources wisely. We explore a variety of topics that most broadly fit in the "Homesteading" category, i.e. beekeeping, organic gardening, edible landscaping/fruit forest, food preservation/canning, woodworking, soap-making, and environmental stewardship.

Search My Blog

I've been featured on:


Followers

Facebook

Contact Form

Name

Email *

Message *

Powered by Blogger.