Simply Resourceful

Simple ways to be more conscious about how we use our resources.

Reusable Lunch Bag & Waste-Free Lunch

A good friend of mine (who also sells homemade soap), is a budding seamstress and eager to begin some sewing projects.  In particular, she wants to make lunch bags.  I volunteered to help her even though I'm not an expert at the sewing machine; although I think I acquired through osmosis, some skills from my mother who is a professional seamstress.

I was inspired to use burlap when my friend and I stopped by a local boutique store and saw lunch bags made with burlap.  For the inside liner I used leftover fabric from a curtain project.  The burlap was taken from a coffee bean bag that a picked up from a local coffee store.  The button came from my button jar that I salvaged from some random worn-out shirt long ago; and for the latch I used an elastic band that broke from a pair of shorts I have owned since middle school.  This project cost $0.00.  I really enjoyed making this project because I acquired more skills at the sewing machine.  It is also a practical item I can use for work or wherever.  I recommend hand washing it.

Dimensions:


Back/Flap: 6.5 by 14 inches
Front: 6.5 by 8.5 inches
Sides: 5.5 by 8.5 inches
Bottom: 6.5 by 5.5 inches

To make this entry complete, I want to add a few points about making a waste-free lunch.

  • Use durable containers such as Tupperware or Pyrex 
    • Ziploc bags are hard to clean, items are easily smashed and broken, and bags eventually get tossed because of holes and tears.
  • Purchase food items in bulk when possible
    • For example, purchase a large container of yogurt and divide it into small Tupperware containers rather than purchasing the single-serving containers.  You will also save $$.
  • Use durable silverware
    • Plastic silverware break easily and it's probably not safe to eat with plastic, especially with warm items such as soup. 
  • Bring your own cloth napkin and wash it with your towels---save a tree!
  • Use a reusable water bottle or coffee mug
    • Ditch those one-time use water bottles and get a quality, stainless steel, BPA-free water bottle. 


Homemade Soap

I decided to embark on a new adventure of making soap! Nine years ago I made my first batch and decided to revisit this hobby.  The reason for making soap goes beyond the bathroom sink; I will use it to make shampoo & conditioner and laundry soap.  To make shampoo, I need castile soap, which is basically a soap made with 100% olive oil.

When learning a new skill, there are always lessons to be learned.  The first batch of castile soap didn't turn out quite right.  I didn't begin stirring the lye and oil mixture until the temperatures were around 102 degrees.  I also stirred the mixture with a wooden spoon trying to do it the "old fashioned way."  After an hour of continuous stirring, I used an electric stick blender.  I learned that if the temperature gets too low before the mixture reaches this magic stage called "trace," it won't saponify correctly.  (Basically, the chemical reaction doesn't happen correctly and you don't get soap.)  So, in the end, my first batch is a bit too alkaline and not suitable for the skin, but I can still use it for laundry soap.  For the second batch, I began stirring when the temperature was 118 and I used a stick blender at the very beginning.  The soap turned out perfectly.


From the picture on the left, you can see the difference between the two bars.  The bar on the left is from the first batch (it looks sort of white and crumbly), and the bar on the right is from the second batch that turned out correctly.  The second picture is a bar from my third batch which includes: palm oil, coconut oil, olive oil, lavender flowers, and lavender essential oil.  The lavender bar is used for the bathroom sink and shower.

Castile Soap Recipe:
2 lb. olive oil
4 oz. lye
12 oz. water

toothpaste


The last tube of toothpaste met the garbage can last week.  I've been doing some research about homemade toothpaste and thought I'd give it a try.  Like most things, I'm willing to at least try something before eliminating the possibility.  I got this recipe from the Oxray Farm Blog that I watch.  


I've been using the toothpaste for a week now and have a difficult describing what it tastes like.  The best comparison I have is eating vanilla yogurt for years and then eating plain yogurt----going from super sweet to super tart.   It took a lot of convincing to use this stuff the first week.  The ironic thing about this homemade toothpaste is that my teeth actually feel cleaner after I brush.  My teeth feel super smooth!  I can get used to the sour taste and lack of bubbles, but I really miss the minty fresh feel that conventional toothpaste leaves in the mouth after brushing.


Recipe:

almost 1/4 c. baking soda
almost 1/4 c. coconut oil
4+ drops of peppermint essential oil (more or less as needed)
about 1.5 Tablespoons of honey
1.5 teaspoons hydrogen peroxide


Eating Leftovers...

It has been 6 days since a meal has been cooked in this house & I am ready for something new!!  I have eaten enchiladas for 4 nights in a row while Jon has been eating cabbage casserole.  Jon and I set a very rigid rule in our home years ago: NO WASTING FOOD.  No matter how much we dislike something, we will eat it as long as it hasn't spoiled and won't make us sick.  We don't purposefully put ourselves through the misery of eating the same dish several nights in a row; we just have deep-rooted values about throwing food away.  Even if the food can be composted, we believe it is morally wrong.  Believe me, we never repeat the same recipe after making it wrong the first time and we remember how much volume a recipe produces.  How many of us can remember hearing our parents say, "There are starving kids in China!"

I hope that our wasting food philosophy will be instilled in Paul.  At the age of 2.5 he understands when I say, "Finish your oatmeal before more raisins."  I admit that Paul has gone to bed hungry many times because he refuses to eat something.  My son is not going to only eat macaroni & cheese and cookies!  What is put on your plate, you eat.  What is left on Paul's plate when he is finished, Jon or I eat (reluctantly most of the time).  I feel a deep connection in the food I eat and can't help but consider the amount of energy it took to grow the plant or animal and transport it to my table.  From a financial standpoint, it makes cents; you are basically sending money to the landfill when you throw food away.

With the refrigerator empty & clean, I take a deep breath, and dive into my cupboards to unearth more random jars of forgotten beans, and containers in the freezer full of pumpkin from the fall.  Seeing an empty fridge gives me a boost of creativity!  What's for dinner tomorrow?  Our family favorite----homemade pizza!  We love pizza leftovers!

Homemade Dishwasher Detergent

This is a recipe I found online.  My goal is to find a do-it-yourself solution to common disposable items in the home.  This is my first time making dishwasher detergent and I can't tell the difference between this mix of ingredients and other name brands such as Seventh Generation, BioKleen, and Ecover.  We use our dishwasher about once each week so this jar will last probably a year. 


Recipe:
  • 3 cups borax
  • 3 cup washing soda
  • 1 1/2 cup citric acid
  • 1 1/2 cup kosher salt
This recipe fills my one gallon jar about half full.  I use a small plastic scoop for filling the dishwasher. I found this random scoop in my laundry cupboard.  A lid from a laundry detergent bottle or yogurt container would work just fine too.


**Update 3-27-2011**  The jar I used didn't have an airtight seal---moisture got inside the jar which caused the powder to harden into one big rock.  It took about an hour to chip away at this mass using a welding rod, but eventually I loosened it all up and transfered it to a better container with a tighter lid.  Word of advice: use a container with a tight seal for storage!


A word about phosphate-free detergents: 
In the past couple of years, there has been some hype about phosphates in detergents.  I have been told that when they enter a natural waterway such as a stream, the phosphates absorb a high volume of oxygen in the water which increases algae growth.  The reduction in oxygen creates an unbalanced ecosystem for fish and other oxygen-breathing organisms.  Here in Portland, our sewer often overflows into our waterways when there is an abundance of rain.  Even when phosphates enter modern wastewater treatment systems, breaking down phosphates is a very complicated process and nearly impossible to accomplish.  I have been using phosphate-free detergents for years and haven't noticed any difference in the outcome.  I don't have a lot of "whites" to wash, so the extra cleaning power that phosphates provides doesn't really matter to me.  I would attempt to explain what the chemical properties of phosphates are, but I find it best to just quote what I've been finding online: 
 "One important function of phosphates in detergents is to enable the cleaning components of the
detergent to act, by preventing interference by the “hardness” of water (mineral ions). Even in soft water, this is necessary because of calcium and magnesium ions in soils and dirt. This function is termed “builder”.  Phosphates also maintain the correct pH for cleaning components to act, in particular the high pH necessary to ensure sanitisation (killing of bacteria) in dishwashers."  source

Do dishwashers really save energy?
I'm not convinced that dishwashers save electricity and water.  I find literature and ads that say dishwashers are the better choice over hand-washing.  Could these "fact givers" be salesman in disguise trying to sell products?  

There are two main points to consider: 

1. The hot water demand while hand-washing is a significantly shorter time period than the dishwasher---thus saving energy.  I can complete a load of dishes by hand in 30 minutes or less, whereas my dishwasher takes about 2 hours. Any time during that 2 hours, I can turn on the kitchen faucet and have instant hot water which tells me the water heater is getting constant demand for 2 hours vs. 30 minutes. 

2. Let's look at the entire lifecycle of the dishwasher.  The lifecycle is a close analysis of the resources that go into a product, transportation, production, assembly, distribution, use, and where it goes when it's useful life is finished.  Basically a cradle to grave analysis.  So what if washing dishes by hand uses 4 gallons of water vs. a dishwasher that uses 3; look at the big picture, not just the number of gallons used.  I doubt the entire lifecycle of a dishwasher is included in any of those literature brochures... 


**Ironically, this very question was recently answered in the monthly newsletter we receive from our electric provider.  My question about thermostat settings was also answered.  


Torching the Hives!

The mystery of what killed the bees still remains a mystery.  I have been told that cold is an unlikely cause because of the mild temps in this area.  Others suggest failing queens, disease, or moisture.  Moisture causes are hard to diagnose because the dilema is, what came first: mold development from the lack of ventilation or did the mold arrive after the bees died?  I have moved beyond the need to solve this mystery and decided to provide better ventilation this next year and eliminate as much mold as I can to alleviate some of the workload for the bees.

Last weekend I attended a monthly bee meeting at Zenger Farm.  This is a great place to meet other beekeepers in the area and learn hands-on skills with the farm's apiary.  At this meeting, I bee-friended another newbie in the group.  He is starting beekeeping this year and is full of questions and energy like me!  His hives are used, so he blow-torched the insides to kill the mold and any possible diseases that could be lurking in the old hives.  He offered me the use of his blow-torch which I was extremely grateful for!

So...here's the process:  1. empty the supers of all frames, 2. slightly scald the interior of the boxes taking extra care in the corners, and 3. sand off the black char.  An optional step at the end is to spray the boxes with straight vinegar. Like everything in life, everyone has opinions.  Some beekeepers I talked to never torch their hives and leave it up to nature and the bees to get rid of the mold.  I try to have a biodynamic approach to beekeeping, but I also have a caring sole and want to help lessen the workload on my bees.  There is plenty of mold on the frames and comb in the hives which will keep the colonies plenty busy when they enter their new home.  The mold I can get rid of is on the inside of the supers/boxes.  To get mold off the frames, I would litteraly have to scrape off all the comb which is a messy job and the hives are half-full of honey.  I have also read several books that recommend beekeepers to scorch their hives every couple years to kill any possible diseases.  I also think scorching could help seal the wood more on the inside.

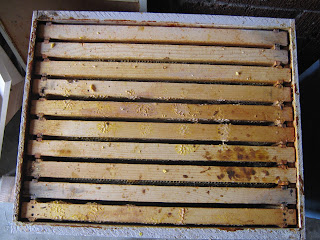
Notes:  The red stuff you see on the boxes is propolysis which is good stuff----very sticky stuff that bees gather from sap on trees and resins from plants to help seal all cracks in the hive.  Think of it as insulation for their home.

(Super full of frames)

(Black/gray stuff is mold)
(Scalding the inside to kill the mold)
(What the blow torch looks like)
(Sanding after the scorching)
(Finished super after the torching and sanding)


Homemade Cliff Bars

If you have a sweet tooth like me and need a quick healthy alternative away from the M&M's, these are for you!   We eat these as a dessert and take them on play dates and day trips.  I copied this recipe years ago from some random website.

1 1/4 cup rice krispies
1 cup uncooked quick-cooking oats
3T flaxseed meal
1/4 cup dried fruit
1/4 cup finely chopped nuts
1/4 cup honey, maple syrup, or molasses
2T brown sugar
1/3 cup nut butter (pb, almond, cashew, soynut)
1 tsp. vanilla
1/2 tsp. cinnamon (optional)

1. Combine dry ingredients in a large bowl.

 2. Bring syrup and brown sugar to a boil over medium-high heat, stirring constantly, remove from heat. 

3. Stir in nut butter and vanilla until blended. 

4. Pour nut mixture over cereal mixture, stirring until coated. 

    5. Press mixture firmly into an 8-inch greased pan.  Store in refrigerator. 


About this blog

A weekly update on our adventures of trying to be more self-sufficient by using resources wisely. We explore a variety of topics that most broadly fit in the "Homesteading" category, i.e. beekeeping, organic gardening, edible landscaping/fruit forest, food preservation/canning, woodworking, soap-making, and environmental stewardship.

Search My Blog

I've been featured on:


Followers

Facebook

Contact Form

Name

Email *

Message *

Powered by Blogger.