Simply Resourceful

Simple ways to be more conscious about how we use our resources.

Showing posts with label Sewing. Show all posts

Making Mittens From Wool Sweaters

I have been needing a pair of warm mittens for years and decided to make my own after scouring the internet for a reasonably priced, high quality pair made in the USA.  During my search, I found several websites selling mittens made from wool sweaters, and I said, "Those look easy to make, why don't I make myself a pair?" 

At the local second hand store, I purchased several 100% wool sweaters of various colors.  Before cutting the sweaters, I shrunk them in hot water followed by high heat so the wool fibers would get really tight.

The insides are lined with warm fuzzy fleece.

To date I have made fourteen pairs of mittens to sell at the Wild Ramp and for giving to friends.  

Adding a button to the mitten cuff gives the mittens a finished look and keeps the cuff from folding down.  When I add the button, I sometimes don't stitch down the cuff.

This video provided the best tutorial that I found on the internet.  A printable pattern can be found at: http://romancakedesigns.com/  I found this pattern to be a little small for my hand so I made the pattern a little larger.


Owl Water Bottle Cover


For Christmas this year, Jon gifted Paul and me each a Mabis Water Bottle to cozy-up with at night when crawling into cold sheets.  And of course, these water bottles are good for other things such as: sore muscles, sports injuries, and headaches just to name a few.  Instead of the rubber latex against our skin, I made a cozy for the water bottle using fabric scraps.  The brown fabric is a fleece jacket sleeve and stays closed with velcro in the back for easy removal.  A primitive stitch attaches the wool designs to the brown fleece fabric.  The owl wings are corduroy fabric.  This was an easy and fun winter project.  I am still trying to decide what cozy I should make for the second water bottle. 


Make Your Own Holiday Gift Bags

This holiday I am trying to use less wrapping paper by using cloth drawstring bags. Using up some fabric scraps, I made my own.  Listed below are instructions on how to make a bag followed by pictures of other bags that I designed.  Also, don't forget to check out my post titled Resourceful Gift Wrapping from several years ago. 

1. I cut two pieces of red fabric 9x10 inches and two strips of green fabric 3x10 inches.  For each piece of red fabric, attach the green strip by putting right sides together and sew along the top edge.

2. Next I sewed three sides of the bag.  On one of the long sides I left an opening for the ribbon by sewing 1 3/4 inches from the top, stopping, and then starting again 1/4 inch from the bottom of the green and continuing down the length of the red.  For a drawstring bag with ribbon coming out of both sides, you can leave gaps on both sides of the long edges.  (Optional: If you want to keep the edges from fraying, serge.)

3. There are a few ways to sew the bottom corners and there are several youtube videos showing the process.  With the bag inside out, open up the corner and line up the bottom and side seams, fold it flat.

4. Sew across the bottom and side seam one inch from the corner.  Before sewing the other corner, make sure that you fold the bottom seam in the same direction as the opposite corner so that it lays flat and isn't twisted.

When the bag is inverted, this is what a bottom corner should look like, and if you are lucky, the bottom and side seam will line up.

5. With right sides facing out, fold down the green fabric below the side opening, leaving about a 1 1/4 inch fold.  Stitch on the green fabric right next to the red fabric all the way around, checking that the side seams are facing the same direction and not twisted.

This is what the top of the bag should look like with a hole on one side for the ribbon. 

6. For a finished look, sew along the top of the bag.

7. Using a safety pin, thread the ribbon through the opening.  Finished!

Pictured below are a few more bags I made with applique and printed fabric.


I add two layers of batting behind the applique designs.


Handmade Fabric Valentines

Valentine's Day is one of my favorite holidays because it taps into that giddiness I felt as a young girl making my valentine box at school and looking at each and every valentine I received over and over.  It is a special day to tell those you love that you really care about them.  This year during my mom's visit over the Christmas holiday, we made heart pillows using scrap fabric, felted wool, buttons, and antique lace.  These pillows were really easy to make and most didn't even require a sewing machine.  My mom designs and sells quilt patterns and other fun things on her website and has a pattern for these delightful little pillows called "Tokens of Affection."

Every heart pillow is unique with it's fabric combinations and details on the front.

This was my favorite pillow all stitched by hand using felted wool for the red heart, three small white buttons, and a running stitch along the edge.  Simple and elegant.

All of the hearts have different thicknesses using combinations of fiberfill and quilt batting.  

There are so many fun combinations that we just couldn't stop!  All together we made 32 heart pillows.

I really like the hearts with pockets that can hold a valentine or love note!

In addition to the heart pillows, we made vintage valentines printed onto aged scrapbook paper found at an antique store. Some ribbon was also used to give it that old-fashioned look.

Making the heart pillows and paper valentines was so much fun that we couldn't resist selling them at The Wild Ramp!


Contributing to a Sustainable Local Market

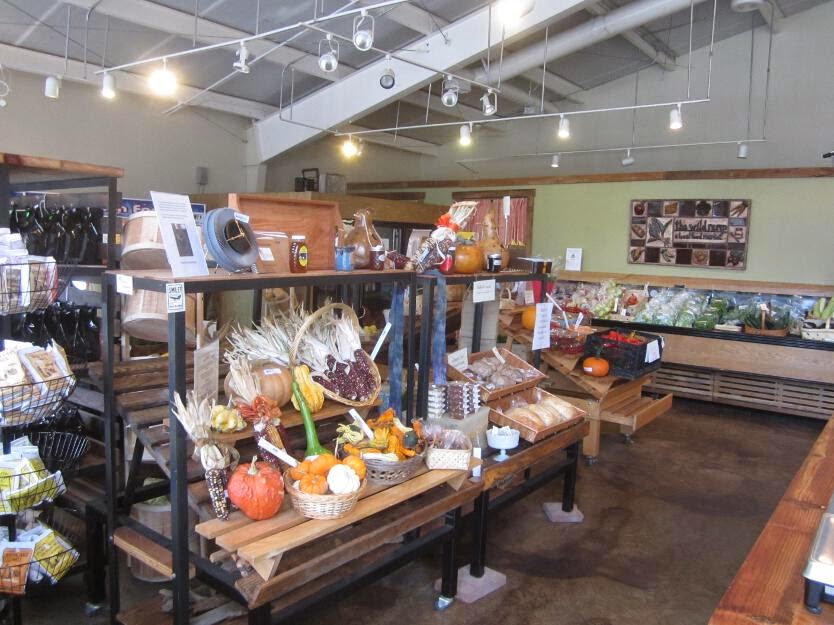
Beginning mid-October this year I started volunteering and selling items at the Wild Ramp, a local food and artisan store selling products grown and made within 250 miles of the store in Huntington, WV.  The Wild Ramp is like an indoor farmer's market where farmers personally drop off their produce and talk with customers; and where handmade artisan products are sold by local community members.  There are only three paid staff members at the Wild Ramp so the store relies heavily on volunteers to keep things going on a weekly basis.  I have been told for several years that Jon and I should sell our handmade toys and wood items that we make.  I always assumed that people wouldn't buy our stuff because of the price we have to charge to make it worth our time.  Well, come to find out, people are willing to pay and it seems that I can't keep up with the demand!  I included a few pictures of items I am currently selling.  Producers pay a $15.00 fee per month to reserve shelf space and receive 90% of the profits.

With the holiday season, I put together a few centerpieces made with holly, pine cones, dried berries, and pine boughs from our woods. 

I have been making holiday wreaths for five years now and they are super easy to make so I made a few to sell.  Like the centerpieces, I gathered supplies in the woods and even tucked a few turkey feathers in the greenery from a friend who raises turkeys.  This was my first year making bows with the help from youtube.

I made a mushroom rattle as a baby gift for a friend four years ago and they were so cute that I made more of them and expanded the rattle design to apple trees and ladybugs.  In less than a month, all of the mushrooms sold!  

On the top shelf in this picture are a bunch of my wooden toys that are really popular at the Wild Ramp.  To see the toys better, click the picture to enlarge.  In one month, I sold all but two of the cars on that shelf and even had a special order for two of the dump trucks.  Like the rattles, I continue to make more and restock the shelf on a weekly basis because they sell out quickly!

Most producers include specific information about their items and where they are located so customers feel more informed about the product.  For instance, meat and dairy products have labels for grass-fed only, grain-finished, free-range, non-GMO feed, etc.  For my toys I tell customers that I use re-purposed wood and seal it with a child-safe linseed and beeswax finish.

These log stools are really cute and modeled after the traditional milking stool.  The logs are gathered from our property.

We are also selling bag drying racks with the message, "Don't throw away your Ziploc bags!  Wash and hang them to dry on this rack."

Overall, volunteering and selling my wares at the Wild Ramp has been a productive use of my time while Paul is in full-day Kindergarten.  Whether it's seeing a customer get excited about my wooden toys or talking about different chicken breeds to the farmer who sells eggs, I have so much fun just being at the Wild Ramp.  It's a place where you feel part of the community and are surrounded by like-minded people. 


Handmade Log Carrier

We have been wanting a log carrier for years and now we finally have one!  It took a little bit of creative thinking to make this, but an hour is all it took for this project! 

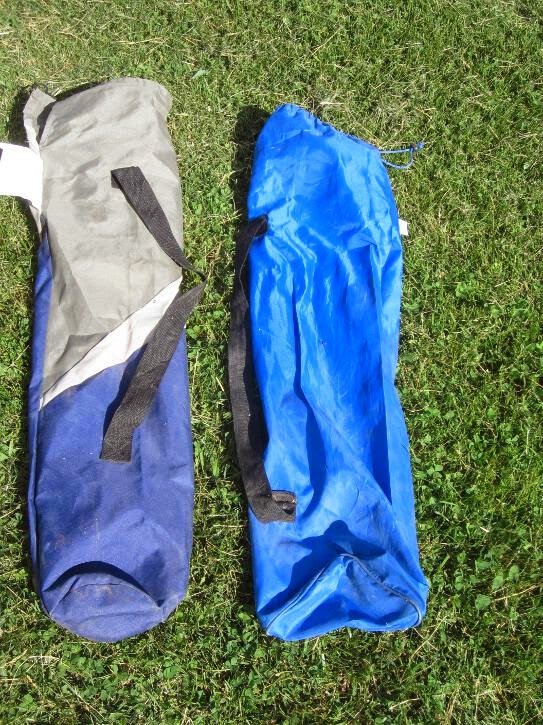
This project requires two butterfly chair cases.  For demonstration purposes, I included a picture of two bags so you can see what I'm referring to. 

I wish this post could be a tutorial but I didn't think about making this crafty project into a blog post until half way through sewing it.  Basically I cut the ends off two bags, overlapped them to create a reinforced center, and sewed all the seams to keep it together and to prevent fraying.  Note: I left the straps alone---no sewing.
Dimensions: 22W x 31L

The carrier works really well!  The material is easy to clean, light weight, and sturdy.  


How to Make Cloth Pads

Twelve years ago I purchased my first Keeper and Glad Rag.  I loved the idea of saving money and resources and decided to give this a try!  The first initial purchase seemed a bit expensive, but they were worth the investment because they lasted for years.  Just recently a friend expressed interest in having some pads made for her daughter, so I decided to make this tutorial for those interested in making your own.  You can save a considerable amount of money making them yourself, especially if you don't have to purchase the flannel.  Recently I was given a pile of flannel scraps leftover from making pajamas.  These scraps made 16 pads!  I want to mention that you can make cloth pads without a sewing machine.  In fact, all of my pads until recently were made without a sewing machine...I spent many hours hand sewing during the long winter months.  I don't have a pattern on my blog, but it's simple to make one, just trace a disposable one that you may already have (add about 1/4 inch all the way around to account for the seam) and customize it for your own needs.  Some people add PUL, waterproof fabric, for leaks.  This is a personal preference.  I chose not to use it because the body needs to breathe and PUL can trap moisture.  I don't have problems with leaks because I use the Keeper too.

For washing, I soak the pads in a bucket of water and rinse them before tossing them in the washing machine.  I have a front loader and small items tend to get stuck in the door gasket so I place the pads in a nylon mesh bag (similar to what you put nylons in).  


I make three sizes: light (4 layers), medium (6 layers), and heavy (8 layers).  
For those interested in making your own, I included instructions below on how to make the medium size.

Cut 2 pieces of flannel fabric.  Place right sides together.

Sew about 1/4 inch from the edge all the way around leaving an opening on the wing.

Invert.  Notice the opening on the right wing.

Cut 4 pieces of flannel (absorbency layers) to fit the center of pad.

Fit the center absorbency layers in the middle of the pad leaving enough space at the top and bottom for sewing.

Using a zig-zag stitch, sew where the absorbency layers meet the pad.  By sewing on the edge, you are alleviating frayed edges after washing.

What it should look like after sewing the zig-zag stitch.  Click the picture for enlargement.

Stitch the opening on the wing closed and add snaps to the wings.  I've used velcro instead of snaps, but the velcro edges always scratch my legs and didn't always stay closed.

So there you have it...pretty easy without a lot of steps!  


About this blog

A weekly update on our adventures of trying to be more self-sufficient by using resources wisely. We explore a variety of topics that most broadly fit in the "Homesteading" category, i.e. beekeeping, organic gardening, edible landscaping/fruit forest, food preservation/canning, woodworking, soap-making, and environmental stewardship.

Search My Blog

I've been featured on:


Followers

Facebook

Contact Form

Name

Email *

Message *

Powered by Blogger.