Simply Resourceful

Simple ways to be more conscious about how we use our resources.

Showing posts with label Greenhouse. Show all posts

The Best Bean Trellis Ever


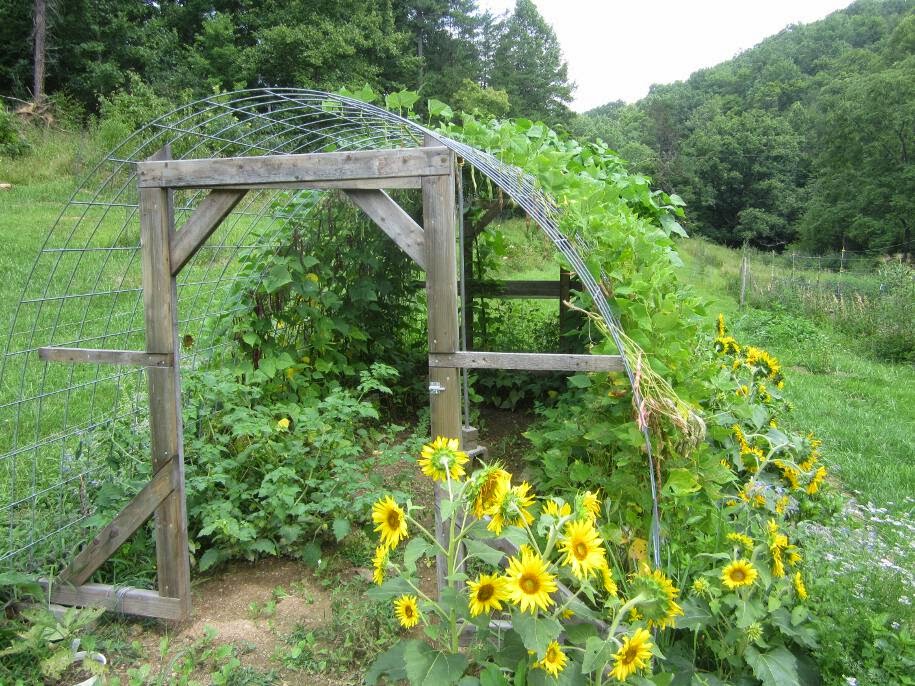
This summer we finally have a sturdy bean trellis.  In the past we used the traditional tepee design using logs tied together at the top.  The picture on the left was taken the previous season.  The problem with the tepee is the height and lack of airflow.  When the vines reach the top, they twist on themselves resulting in fewer flowers and beans.  It is a gnarly mess, and by the end of summer, the logs are sprouting mushrooms.  This year after removing the greenhouse plastic, Jon decided to use the frame (which is just cattle panels) as a trellis.  This trellis has produced great results!  There is plenty of airflow and space for the vines to sprawl without twisting on each other. Every day we walk through the greenhouse to gaze up at the hanging beans.  It is pretty to look at!  I included some pictures taken from different angles (click to enlarge).


Snapshots of a Summer Day

It's been awhile since I wrote a post about a typical day here at the Wolfe house.  Our day begins with opening the chicken coop and closely watching the hens scatter into the weeds to lay their eggs.  With the snake coming and going from the coop, only two hens lay eggs in the coop.  Finding the nests in the weeds have been a challenge because the hens only lay in the same spot for a few days before they make a new nest.  The nest in the picture was located next to the creek where a very large snapping turtle lives so I promptly moved the eggs.  We would love to have baby chicks (in case they get broody), but the snapping turtle is a bit of a threat.

The snake left for about a week but promptly returned to devour two eggs before I gathered them.

Most days we throw something outside the garden fence or patio door for the chickens to eat.  In the picture above they are devouring a squash that was half rotten.  We did cull one of the barred rocks a few weeks ago.  She was the runt of the litter who was bullied by the other hens and she even started pulling out her own feathers.  When she stayed in the coop all day and lost a lot of weight, I decided it was time to cull her.  For weeks there were eggs in the nest box without shells and ones that easily broke when touched.  It was no surprise that when she was culled, she was egg bound.  Her grooming habits had lessened and she also had a terrible case of lice.  I promptly treated the flock with Poultry Protector even though they all looked really good thanks to daily dust baths.  


Fresh produce decorate the kitchen counters all summer long.  This year we have a beautiful assortment of tomatoes.  The yellow ones are Wapsipinicon peach.  With the temperatures being somewhat cool this summer, we have been enjoying fresh bread as well!  Using the oven and keeping windows open all day long is a treat!

The garden is a jungle right now with so many weeds, sprawling tomatilloes, and never-ending squash vines.  I'm not sure how or when this happened, but the tomatoes took over!  In the picture above there is no room to walk and you can barely see two distinct rows.  This crowding is a bit of a concern for spreading of disease and picking the tomatoes without damaging the plants.

Many of the tomato plants have some blight but these black tomatoes are looking terrific!  The stalks and leaves are healthy and the tomatoes don't show signs of rot.  We aren't sure what the actual name of these tomatoes are because we saved the seeds from a tomato our friend Anna, so we affectionately call them "Anna's Black" tomatoes.

And of course, it's not summer in our home without the small room next to the kitchen cluttered with preserving supplies...canning jars, food dehydrator, canning pot, cider press, etc.  It is nice having this extra space so I don't have to put things away after each use.

This summer the honeybees have been left alone to do their own thing.  Each hive started with not even 10 frames of partial comb so harvesting honey was wishful thinking.  During our recent inspection, one hive was very prolific with four frames of solid capped honey whereas the other had not a single frame of solid honey.  Both hives look healthy with a good population and laying queen.  Entrance reducers were put on both hives because last August, the hives were robbed by the yellow jackets and wax moths.  The entrance reducers should help the colonies defend their home and reduce any robbing that may occur between the two hives.  In the picture above you can see Paul wearing very little while my friend and I are performing an inspection.  He is not afraid of the bees and is always present during inspections.  The last incident of a honeybee sting happened when he was 2.5 years old in a small pool.  Three years later he is still running around barefoot through clover wearing only a pair of underwear all summer long.  Paul is a pretty care-free child who runs across gravel barefoot and rolls in the weeds filled with chiggers.  

Every year we use a different trellis for beans but we are never satisfied with the results.  The beans always seem to run out of room, trellises fall over, or the beans are too crowded.  This year Jon came up with a brilliant idea to use the greenhouse as a bean trellis!  There isn't much use for the greenhouse during the summer because of our hot and humid temperatures so we removed the plastic covering and planted things in and around the greenhouse frame.  I will be blogging about the bean trellis soon but everyday we stop by to marvel at the number of hanging beans and to observe the pollinators on the sunflowers.

And after a day of hunting for eggs, preserving produce, pulling weeds, and making plans for the next day, we take some time to walk around the garden and mini orchard to enjoy the fruits of our labor.  It is so easy to get caught up with all the work that needs to be done, but we stop and do what we call a "walk around."  This is a time for meandering around to observe everything and pat ourselves on the back.  While Paul runs ahead of us to marvel at how much his asian pear tree has grown; Jon is squeezing a peach to check for ripeness; and I watch honeybees make their final trip home for the day covered in bright orange pollen.  


Winter in the Greenhouse

It's been a cold winter here in West Virginia. Paul has only attended six full days of school out of 22 for the month of January.  With record breaking lows, the shut off valve to our home freezing, and slippery roads, it seems like Mother Nature is telling us all to slow down and stay home.  This past fall we built our first greenhouse and have been surprised that we still see growth on our spinach, poc choy, and kale despite night time temps falling below freezing every night. Their growth has been very slow but they manage to hang on!


I took this picture when the greenhouse was covered with snow and it was 6 degrees outside.  The thermometer reads 28 degrees.  There are a few gaps around the perimeter that Jon left loose so we could get a little air flow in there to cut down on mold growth. We had a brief heat wave come through yesterday and temperatures peaked in the 60's - Jon happened to look in the greenhouse and it was 90 in there with buckets of ice quickly melting.


A Large, Cheap and Easy Greenhouse For Under $300

The finished product
We've battled for years about spending a lot of money on a greenhouse. Most greenhouses that fit our growing needs cost $2000-4000. We just couldn't bring ourselves to cough up the money for that. Then Jon came across a Youtube video that used cattle panels as the skeleton and voila, we had a weekend project. The video that Jon watched will about make you nauseated (the camera jumps around everywhere) so we fast-forwarded through it and got the basic idea and went to town improvising the rest.  In the end, what we came up with has turned out to be fabulous and only cost us about $255.80.

Dimensions: 16 x 8 feet of growing pleasure
20x20' of greenhouse plastic*- $62.80 
2 Earth Anchors - $14
14 - 2x4x8's ($3/board) - $42
15 haybales - $45
Barrel Latch to hold window - $3
4 - 16x4' Cattle Panels: $80
24 - zip ties - $3
1 lb - 2 1/2" Wood Screws - $6
10' of pretty thick wire -  Leftover from another project
1 - Pipe insulation foam - Leftover from another project
10 Concrete blocks - Free - found them on the property
2 door hinges - Free - found them in a box of misc parts
5 old windows - Free - re-used from our previous home
Misc. scrap pallet wood - Free
* from Peaceful Valley Farm & Garden Supply (RPK Tufflite IV) 
Leveling the foundation.
Notice the braces on the corners---they help with stability.

A trial set up in the garage. This was key in getting the length and angle for the support posts. To make the angle right, we held the full length 2x4 up and penciled the angle onto the 2x4 where the cattle panel intersected it.

Zip ties add stability between each panel.

Pipe insulation helps keep abrasion between plastic and panels to a minimum.
The skeleton is ready for plastic.

Earth anchors with old electric fence wire keep the structure anchored to the ground in strong winds.

Using the cinder blocks to raise the greenhouse off the ground allows Jon to stand up without hunching over.  The cinder blocks also keep the wood off the ground so they won't rot.  We did not use treated lumber. 

Looking good, we need some doors now.  Logs temporarily held the plastic down until the haybales arrived.
We probably didn't buy enough plastic (25 feet may have been a better choice), so we improvised.  We had some old windows laying around for cold frames and they happened to be wide enough to fill the door gap, so we just framed them in with 2x4's. We used scrap pieces of wood to ensure they didn't fall out and those subsequently also doubled as door handles.
Inside looking out the front door.

Blocks of wood screwed into cross pieces held the plastic in place. 

A latch was added to the back window for easy removal when we need more ventilation.

A view looking at the back window from the inside.

This is our Listada Vi Gandia Eggplant.  All but one plant died this summer from flea beetle damage.  This one finally made flowers, but now it's too cold to produce so Jon transplanted it inside the greenhouse and it is thriving!

Our friends who helped deliver the cattle panels in the back of their truck had a great idea  to use hay around the perimeter as insulation.  After a year of rain they will be added to the garden as mulch and replaced with new bales.
So majestic..


About this blog

A weekly update on our adventures of trying to be more self-sufficient by using resources wisely. We explore a variety of topics that most broadly fit in the "Homesteading" category, i.e. beekeeping, organic gardening, edible landscaping/fruit forest, food preservation/canning, woodworking, soap-making, and environmental stewardship.

Search My Blog

I've been featured on:


Followers

Facebook

Contact Form

Name

Email *

Message *

Powered by Blogger.