Posted by
Holly
on
Sunday, December 7, 2014
comments
(1)
Three years ago I wrote about Resourceful Gift Wrapping. Since then we have taken it a step further by making our own wrapping paper. We use plain paper that has been included in packages we receive in the mail and Paul's fingerpaint. If your children are grown and you don't know what to do with all that random, half-dried paint, this is a good project for it!
Having Paul paint on paper is a great way to pass the time during the long summer days. We held the paper down using blocks of wood. This picture was taken August 2013.
Paul had fun drawing pictures, writing letters, and just scribbling. In the end, it doesn't really matter what the designs look like because the paper will be cut to fit the packages. The key is to have a lot of colors and irregular lines.
If you don't have a child to help with painting, you can do it too. And don't say you aren't creative and artistic...dots, lines, and swirls look pretty awesome too!
Have you ever visited a school cafeteria and been completely disgusted by the amount of food being wasted and all the one-time use packaging that is quickly discarded to the landfill? Well, if you haven't, it's an eye-opening experience revealing the wastefulness of our current society. In this post, we'll show you how our little tiger is doing his small part to help...
In keeping with our values on reducing waste, Paul has a waste-free lunch kit. All of the containers can be used over and over again. The lunch bag contains an insulated thermos, a stainless steel water bottle, a small plastic container, a metal spoon, a small stainless steel container, a cloth napkin, and an orange plastic food wrap that has a Velcro closure and can be used as a place mat. I imagine some parents cringe at the very thought of sending containers and silverware to school with the worry that they will end up in the garbage. Accidents do happen, and thankfully Paul has brought home everything, but I do send him with containers and silverware that don't go with my best matching Tupperware and silverware set. In fact, the white plastic container was previously a cream cheese container.
In case you are interested, the orange plastic food wrap and small stainless steel container came from U-Konserve. The U-Konserve website is a great place for waste-free lunch kits.
Food packaging and food waste in general is definitely a problem in schools. With pre-packaged lunches, snacks, and beverages, a lot of unnecessary waste is ending up in our landfills. Not to mention the quality of food the children are eating and the excess spending from parents. Pre-packaged foods cost a lot more money than making things from scratch. There are some who may argue that finding the time to make a homemade lunch is too much of a time commitment. To save time, I prepare things ahead of time such as cutting a weeks worth of cheese at one time from a big block so I only need to grab a slice each day.
At the Kindergarten luncheon the parents attended last week, I was shocked to see one-time-use paper tablecloths covering every table in the lunch room. With school budgets getting squeezed, I don't understand how this wasteful spending can be justified.
When Paul empties his lunch box every night for cleaning, we compost his scraps which are typically apple cores, grape stems and banana peels.
We have been reusing our plastic Zip-loc bags for years. We simply wash them and hang them to dry on our handmade log dryer.
Making a bag drying rack is really easy. A log is cut in half, sanded smooth, and coated with two applications of polyurethane. We leave the knots and other features on the log because we like that unique look.
Holes to fit the dowels are drilled randomly on the rounded side.
We use a 3/8 inch oak dowels for our drying racks. The dowels don't have to be symmetrical. The longest dowel is 15 inches long and the shortest is 6 inches. The racks in the picture above are being sold at the Wild Ramp, a local food and artisan store. Reusing our Zip-loc bags is one simple thing we can do on a regular basis to conserve resources.
We have been wanting a log carrier for years and now we finally have one! It took a little bit of creative thinking to make this, but an hour is all it took for this project!
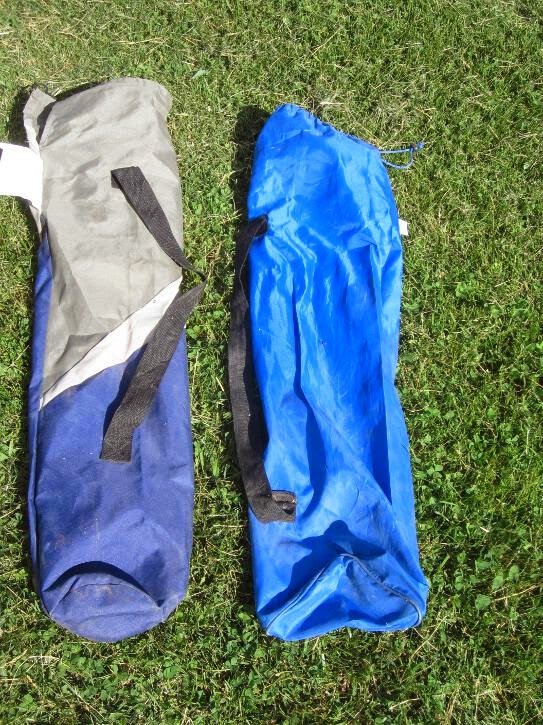
This project requires two butterfly chair cases. For demonstration purposes, I included a picture of two bags so you can see what I'm referring to.
I wish this post could be a tutorial but I didn't think about making this crafty project into a blog post until half way through sewing it. Basically I cut the ends off two bags, overlapped them to create a reinforced center, and sewed all the seams to keep it together and to prevent fraying. Note: I left the straps alone---no sewing.
Dimensions: 22W x 31L
The carrier works really well! The material is easy to clean, light weight, and sturdy.
Twelve years ago I purchased my first Keeper and Glad Rag. I loved the idea of saving money and resources and decided to give this a try! The first initial purchase seemed a bit expensive, but they were worth the investment because they lasted for years. Just recently a friend expressed interest in having some pads made for her daughter, so I decided to make this tutorial for those interested in making your own. You can save a considerable amount of money making them yourself, especially if you don't have to purchase the flannel. Recently I was given a pile of flannel scraps leftover from making pajamas. These scraps made 16 pads! I want to mention that you can make cloth pads without a sewing machine. In fact, all of my pads until recently were made without a sewing machine...I spent many hours hand sewing during the long winter months. I don't have a pattern on my blog, but it's simple to make one, just trace a disposable one that you may already have (add about 1/4 inch all the way around to account for the seam) and customize it for your own needs. Some people add PUL, waterproof fabric, for leaks. This is a personal preference. I chose not to use it because the body needs to breathe and PUL can trap moisture. I don't have problems with leaks because I use the Keeper too.
For washing, I soak the pads in a bucket of water and rinse them before tossing them in the washing machine. I have a front loader and small items tend to get stuck in the door gasket so I place the pads in a nylon mesh bag (similar to what you put nylons in).
I make three sizes: light (4 layers), medium (6 layers), and heavy (8 layers).
For those interested in making your own, I included instructions below on how to make the medium size.
Cut 2 pieces of flannel fabric. Place right sides together.
Sew about 1/4 inch from the edge all the way around leaving an opening on the wing.
Invert. Notice the opening on the right wing.
Cut 4 pieces of flannel (absorbency layers) to fit the center of pad.
Fit the center absorbency layers in the middle of the pad leaving enough space at the top and bottom for sewing.
Using a zig-zag stitch, sew where the absorbency layers meet the pad. By sewing on the edge, you are alleviating frayed edges after washing.
What it should look like after sewing the zig-zag stitch. Click the picture for enlargement.
Stitch the opening on the wing closed and add snaps to the wings. I've used velcro instead of snaps, but the velcro edges always scratch my legs and didn't always stay closed.
So there you have it...pretty easy without a lot of steps!
Before you recycle old calendars, consider this unique way of reusing them...make them into envelopes! I started making these last year and they worked really well! Best of all, I can customize the size of envelope for its use. For example, my family sends picture cards for Christmas instead of cards. We design our own pictures to fit a standard 4x6 size. To finish off the envelope I use self-adhesive labels for writing the addresses. When the labels are gone, I'll just use scrap paper and glue or tape.
To make the envelopes, I traced the picture and left about 1/4 inch on all sides before gluing the flaps on the sides.
Catapult for Paul made out of chair legs, plywood, eye hook, and rubberband. This thing really launches Duplo Legos!
A shadow box for a friend who is graduating from medical school.
Jon constructs all of the honeybee hive components except for the brood boxes and frames. For awhile he was using the router to make the brood boxes but that wasn't very safe. Someday we hope to find a good deal on a table saw so he can make the brood boxes.
Jon's mom makes quilts and does long arm sewing for clients so we made her a quilt rack out of logs gathered from our woods as her Christmas gift.
My nephew is really into baseball so for Christmas I made him this to hang on the wall. It holds a bat, ball, and glove.
We couldn't wait for this to be finished...a little more organization at the front door!
Finally something more durable for storing seeds! We had a mouse last year get into the plastic containers that were hard to seal. The lid for this new container is made entirely with recycled pallets.
Jon made a wine rack completely out of pallets!
A loveseat made with aspen logs from Wyoming and some walnut logs from our property in West Virginia.
Update: Many of you have asked if I sell any of the rugs I've made. Well, I've decided to offer some of them in my Etsy shop. Enjoy!
Most of you who visit this blog post will recognize these types of rugs; perhaps even your grandmother at one time made them and now they are in your home. When washing rugs as a child I remember how heavy rag rugs were and how long they took to dry on the clothesline. It wasn't until years later that my mom said these were handmade using old clothes. About 10 years later I had a pile of clothes and some worn sheets and decided to hunt down the technique for weaving rag rugs. I recorded 4 videos that show the process and some pictures below.
I hope you feel inspired to make some of these rag rugs during the winter when you are looking for something to keep your mind off the falling snow and cold temps. Traditionally these rugs were made by recycling old, worn out and stained clothing. They were made during a time in history where nothing was wasted. All of my rugs are made with fabric that cannot otherwise be reused...sun-bleached curtains, ripped sheets, stained clothes, etc. If you are intimidated by weaving, don't be. The weave is very repetitious and goes quickly.
How durable are these homemade rugs? One of my rugs is 4 years old and it is the only rug that is used in front of the kitchen sink. It has been washed dozens of times and still holds up to daily traffic.
The Frame:
My frame was determined by the length of steel rods that I could find. Dimensions: 27x38 inches. The frame pieces are about 2 inches wide and about .5 inch thick. The steel rods are 36 inches long and are held in place with 5 eye hooks evenly spaced on each side. Do not use coat hangers or any metal that can bend easily. I haven't tried wooden dowels but I imagine they would bend and perhaps break. 50 nails are used for the frame, 25 on top and 25 on bottom, spaced about 1 inch apart. Total cost for my frame: $2.36
Fabric: sheets, pillowcases, curtains, old clothes, corduroy pants, etc. 100% cotton and polyester work the best because they don't stretch and shrink when washed.
Other Supplies:
-Two clothespins are used to help hold the fabric in place when you aren't weaving.
-Fabric Scissors
Step 1: Making the warp
When you weave, work from the ends of your frame and finish in the middle.
Almost done...by now the warp should be really tight and weaving takes a little longer because there is less space for your fingers to work.
The rug is now complete!
Here are two more rugs that I have made (click to enlarge).
This picture shows the spacing between the rod and the frame.
Video 1: How to Make the Warp
Video 2: How to Weave
Video 3: How to turn around at the end of each row
A weekly update on our adventures of trying to be more self-sufficient by using resources wisely. We explore a variety of topics that most broadly fit in the "Homesteading" category, i.e. beekeeping, organic gardening, edible landscaping/fruit forest, food preservation/canning, woodworking, soap-making, and environmental stewardship.