Simply Resourceful

Simple ways to be more conscious about how we use our resources.

Showing posts with label Woodworking. Show all posts

How to Make Wood Candy Canes

Years ago I saw wood candy canes hanging from our neighbor's Christmas tree.  I just loved the way they looked and thought, "I can make some of those!"

To begin, I rummaged through the scrap wood bin and cut out the candy cane shape using a scroll saw.

To give the candy canes a rustic look, I used the belt sander to make the edges jagged.  This was a quick process because I didn't want a uniform look on every candy cane.

Next, I painted them with white acrylic craft paint.

For drying, I strung them up with a piece of wire.

Using acrylic red paint, I painted stripes. 

Using a rough sand paper, I quickly rubbed each candy cane to give them a worn look.  

Finished!  If you want a more aged look, dry rub the candy cane with a dark stain.


How to Make a Cutting Board

Friends of ours recently announced they got married.  For a wedding gift we made them a cutting board using walnut and hickory wood.  The walnut was milled right here on our property.

The cutting boards were made from scrap pieces so the strips of wood are different widths.  And really, does it matter?  In the picture above, Jon is gluing the wood strips together. 

After clamping each cutting board overnight, the edges were squared off using the bandsaw.

To get a smooth, even surface, the cutting boards were put through the planer a few times. 

For a rounded edge, Jon used a router on all sides, top and bottom.

We used a scroll saw to remove the sharp corners and give them a rounded look. 

The bench sander allowed for easier sanding on the edges to get rid of irregularities from the router and scroll saw.

To seal the wood, I used spoon oil.  Spoon oil is made with beeswax and a neutral oil such as sunflower, safflower, soybean, flax, or canola.  Mineral oil is commonly used but it is a petroleum product.  I used safflower oil because it was in my cupboard.  I made a small batch of spoon oil with 2 ounces beeswax and 4 ounces safflower oil.  Each cutting board only needs about 2 teaspoons of the oil so the excess will be used on more cutting boards and wooden spoons.  This website gives step-by-step details for making spoon oil.

A little dab of spoon oil goes a long way.  I used a cotton cloth to massage it into the wood.

The above picture shows the difference before and after the spoon oil was applied.  The grain of the wood literally pops out at you!

The finished product!  Total time for this project took maybe 1.5 hours.  Cutting boards use up scraps and make excellent presents.  


A Knife Made By a Local Blacksmith


We had the privilege of meeting our blacksmith neighbor, Charlie, two years ago at a festival.  Jon and I were mesmerized watching him hammer away at a red-hot piece of metal while talking to others about the art of blacksmithing.  He had an infectious personality with a knack for educating others and we just had to talk to him.  Some time during our conversation with Charlie we learned that we only live about a mile from each other!  Charlie and his wife Evelyn, are one of those neighbors you are happy to wave to when they drive by, and they never miss a honk of the horn when they see us.  They are pretty awesome people to know, and give more than a generous amount of their time volunteering at the Heritage Farm Museum in Huntington, WV.

When I asked Charlie how he learned the trade of blacksmithing, he said, "I just taught myself along the way.  If you want to learn something, you can find the information in a bunch of places.  Don't be afraid to fail."  Charlie is truly an inspiration with a myriad of knowledge.  Him and his wife built their own home here in West Virginia using their own mill and have a lot of general knowledge about the area and homesteading.  Before leaving West Virginia, I wanted to take something unique with me from the area, so I asked Charlie to make us a functional knife, not just something decorative.  The knife handle is made from myrtlewood, a native evergreen from Oregon that a deceased friend (and coworker) gave to us during our five year stay in Portland, OR.  We have carried this block of wood with us for years, reserving it for something special because it is a unique hardwood from a special friend.  The seven inch hand-forged blade is 51-60 steel.  The sheath was hand-stitched by Charlie as well.  All together, the knife is a blend of OR and WV.

The knife and sheath.

A close-up of the knife handle with his trademark showing on the end of the knife blade.  A large C and B for Charlie Bradley.

A stamp on the blade that reads "C. Bradley Culloden, WV."


It's nice that Charlie stamps the knife with the type of steel used: 51-60.

Knife length.

The leftover chunk of myrtlewood the handle was made from.


The blacksmith shop.

I really like the details Charlie put on the front and side door of his shop.  It's like stepping back in time with the old-fashioned look. 


Inside of the blacksmith shop.

One of many projects he is currently working on, a cannon.

Many tools hanging from the ceiling.


Contributing to a Sustainable Local Market

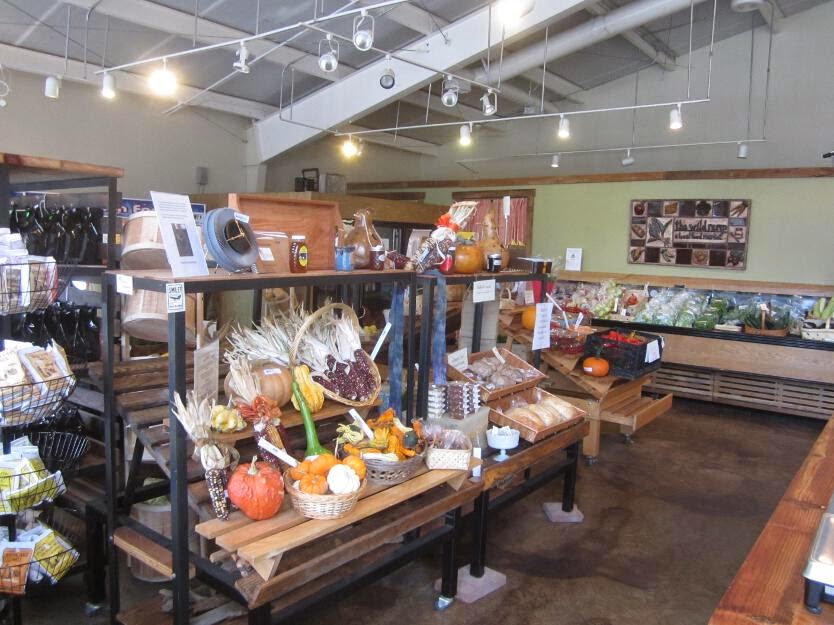
Beginning mid-October this year I started volunteering and selling items at the Wild Ramp, a local food and artisan store selling products grown and made within 250 miles of the store in Huntington, WV.  The Wild Ramp is like an indoor farmer's market where farmers personally drop off their produce and talk with customers; and where handmade artisan products are sold by local community members.  There are only three paid staff members at the Wild Ramp so the store relies heavily on volunteers to keep things going on a weekly basis.  I have been told for several years that Jon and I should sell our handmade toys and wood items that we make.  I always assumed that people wouldn't buy our stuff because of the price we have to charge to make it worth our time.  Well, come to find out, people are willing to pay and it seems that I can't keep up with the demand!  I included a few pictures of items I am currently selling.  Producers pay a $15.00 fee per month to reserve shelf space and receive 90% of the profits.

With the holiday season, I put together a few centerpieces made with holly, pine cones, dried berries, and pine boughs from our woods. 

I have been making holiday wreaths for five years now and they are super easy to make so I made a few to sell.  Like the centerpieces, I gathered supplies in the woods and even tucked a few turkey feathers in the greenery from a friend who raises turkeys.  This was my first year making bows with the help from youtube.

I made a mushroom rattle as a baby gift for a friend four years ago and they were so cute that I made more of them and expanded the rattle design to apple trees and ladybugs.  In less than a month, all of the mushrooms sold!  

On the top shelf in this picture are a bunch of my wooden toys that are really popular at the Wild Ramp.  To see the toys better, click the picture to enlarge.  In one month, I sold all but two of the cars on that shelf and even had a special order for two of the dump trucks.  Like the rattles, I continue to make more and restock the shelf on a weekly basis because they sell out quickly!

Most producers include specific information about their items and where they are located so customers feel more informed about the product.  For instance, meat and dairy products have labels for grass-fed only, grain-finished, free-range, non-GMO feed, etc.  For my toys I tell customers that I use re-purposed wood and seal it with a child-safe linseed and beeswax finish.

These log stools are really cute and modeled after the traditional milking stool.  The logs are gathered from our property.

We are also selling bag drying racks with the message, "Don't throw away your Ziploc bags!  Wash and hang them to dry on this rack."

Overall, volunteering and selling my wares at the Wild Ramp has been a productive use of my time while Paul is in full-day Kindergarten.  Whether it's seeing a customer get excited about my wooden toys or talking about different chicken breeds to the farmer who sells eggs, I have so much fun just being at the Wild Ramp.  It's a place where you feel part of the community and are surrounded by like-minded people. 


How to Make a Bag Drying Rack

We have been reusing our plastic Zip-loc bags for years.  We simply wash them and hang them to dry on our handmade log dryer. 

Making a bag drying rack is really easy.  A log is cut in half, sanded smooth, and coated with two applications of polyurethane.  We leave the knots and other features on the log because we like that unique look.  

Holes to fit the dowels are drilled randomly on the rounded side. 

We use a 3/8 inch oak dowels for our drying racks.  The dowels don't have to be symmetrical.  The longest dowel is 15 inches long and the shortest is 6 inches.  The racks in the picture above are being sold at the Wild Ramp, a local food and artisan store.  Reusing our Zip-loc bags is one simple thing we can do on a regular basis to conserve resources.   


Homemade Pasta Noodle Rack in 5 minutes


This winter we have been making a lot of homemade egg noodles and often times make triple or even quadruple batches for future meals.  Finding a place to dry the noodles can sometimes be a challenge so Jon got frustrated one night, ran out to the garage and made a noodle rack in about 5 minutes!  It is 28 inches tall with 11 dowels sticking out the sides.  I like to put a flour sack towel around the base of the noodle rack to keep noodles from sliding off the counter if they fall.  

Here is a closer look at the base to show how he stabilized it using a 45 degree cut on the miter saw and then just screwing those to a  2 x 4. He also toenailed the main support in using screws on all four sides. Easy peasy and economical as our lil munchkin would say.


Quick and Easy Handmade Seed Starting Trays

If you plant dozens, or perhaps even hundreds of seeds every year but don't have enough of those mini plastic pots to grow your seeds in, then making your own seed starting trays is an economical and efficient way to raise all of your little seedlings.

The trays are fast and quite simple to make:
1) Find some old pallets or scrap wood (we use pallets since we have a huge pile of them at the end of our road). The dimensions are roughly 1/2" thick x 2.5" width. The length of the sides are 17" and 12.75".
This will hold 48, 2" square soil blocks.
2) Assemble wood like this - but it really doesn't matter which direction you put the slats on the bottom just be sure the long side piece (17" gets screwed into the shorter 12.75" piece as shown in green below). The nail gun is not necessary either, but just makes it faster. You could just as easily use a hammer and nails. That's all there is to it.


You should end up with something that looks like this. Toss a single layer of newspaper down and then you're ready to make some blocks.

The soil mix is pretty simple. Feel free to experiment, just remember to not put too much vermiculite, perlite or coir in, or your blocks will fall apart because they will be too porous.  If you don't know what coconut coir is - it's a more sustainable approach to peat moss. It's made from ground up and shredded coconuts and is renewable. We use Beat's Peat (http://www.groworganic.com/beats-peat-3-cu-ft-brick.html). This stuff really swells after you add water and becomes this fluffy gold!


Last spring we tried making our own soil block maker but discovered the round shape wasn't ideal because the blocks tended to dry out from the empty space between the circles.  This year we decided to go ahead and purchase a soil block maker with a square shape from Green Planet Naturals.  The soil blocker above makes 4 mini soil blocks at a time.  You can whip out a couple hundred blocks in 10 minutes - so there is no need to go much larger.

Pushing down on the spring-loaded handle releases the soil blocks.

One box holds 48 mini blocks with a dimple in the center for placing the seed. 

I place a spritz of vermiculite in each hole then place the seed and add a spritz more of vermiculite then press down on the seed with light pressure.


To keep accurate records, I write numbers on the perimeter of the box using a grease pencil.  The number corresponds with whatever is planted in that row and is recorded on a separate piece of paper. 

The record sheet.


About this blog

A weekly update on our adventures of trying to be more self-sufficient by using resources wisely. We explore a variety of topics that most broadly fit in the "Homesteading" category, i.e. beekeeping, organic gardening, edible landscaping/fruit forest, food preservation/canning, woodworking, soap-making, and environmental stewardship.

Search My Blog

I've been featured on:


Followers

Facebook

Contact Form

Name

Email *

Message *

Powered by Blogger.