Simply Resourceful

Simple ways to be more conscious about how we use our resources.

Showing posts with label Health. Show all posts

How to Make Ginger Ale

Ginger Ale is so refreshing in the sweltering heat of summer!  Ginger ale was never my beverage of choice growing up, but now that we make our own, I am sold on it's tart flavor.  Since we use the actual ginger root in our recipe, every bottle is packed with health boosting properties ginger is known for including: soothing stomach upset, respiratory coughs, fevers, and more.  Knowing ginger is good for my body, I don't feel guilty sitting back and enjoying a bottle of our homemade ginger ale.

To make ginger ale, you first have to ferment the ginger root by making a Ginger Bug.  Unlike  berry and sarsaparilla soda that requires champagne yeast, ginger ale uses the natural yeast created from a ginger bug for its fizzy carbonation.


With a wooden spoon, stir the following ingredients into a pint mason jar:
-2T fresh ginger (Skin and grate - I use a micro-plane grater)
-2T unrefined cane juice sugar
-2T non-chlorinated water

Cover jar with a coffee filter secured with a rubber band.

Every day for at least five days, stir in 2T each of grated ginger, sugar, and water.  It should get bubbly and foamy. On the sixth day use what you need and refrigerate the rest adding 2T each of everything (ginger, sugar and water) once each week.  Cap jar loosely when refrigerated.


Once your ginger bug has fermented for six days, you can make ginger ale.

Ingredients:
2-4 inch piece of fresh ginger root, peeled and minced
1 cup evaporated cane juice sugar
1 cup fresh lemon or lime juice (~ 4 lemons)
1 tsp. sea salt
16 cups non-chlorinated water
1 cup homemade ginger bug

*makes 8.5 grolsch bottles

In a saucepan, add  6 cups water, minced ginger root, sugar, and salt.  Bring to a boil and simmer for about 5 minutes until sugar is dissolved and mixture starts to smell like ginger.

Remove from heat and add remaining water.  Cool mixture to room temperature.

Add fresh lemon or lime juice and ginger bug.  Stir.

Fill grolsch bottles.

Store bottles in cooler or cover bottles for several days until carbonated, and then transfer to fridge to drastically slow down the carbonation.  The reason we place the bottles in a cooler is to contain any liquid and glass that may explode in case the bottles carbonate too long.  When we first started making soda, we had a bottle explode all over the kitchen and freshly painted ceiling...a very sticky mess to clean up!

Besides water, there are only five ingredients in ginger ale.

Even though we use organic ginger, we grate it before dicing.

If you have a pirate on the premise, they should help juice the lemons to help fight scurvy!

When adding the lemon juice and ginger bug, make sure the water is not too hot (below 100 degrees Fahrenheit), otherwise you will kill the natural yeast in the ginger bug.

Using a fine mesh strainer helps produce a cleaner product. Then cap and vigorously shake the gallon jug for 20 seconds or so.

Use a funnel with a slight indent at the bottom so air can escape when filling the grolsch bottles. 

Almost finished...final capping of the bottles. 

To be on the safe side, we recommend storing the bottles in a cooler in case a bottle bursts. Check daily for carbonation.  Small bubbles forming on top of the beverage indicate carbonation is taking place.  If a quick rush of air escapes when you slightly loosen the wire barrel, then it's probably time to place the bottles in the refrigerator maybe slightly before then. We recommend that until you get used to how fast carbonation takes place (which is highly dependent on the ambient air temperature), that you have a test plastic soda bottle as a control bottle just so you know how fast they are carbonating.

Some sources I referenced when perfecting our recipe include: Wellness Mama and Nourished Kitchen.

Teaching Others About Gardening and Preserving Food


This week I helped my friend, Pam, teach a class on growing and preserving food at a local MOPS group.  This is the same place I taught homemade cleaning projects and soap making in 2014.  The group had a lot of great questions for us and there seemed to be a few interested in starting a small backyard garden and preserving food.

Years ago the very thought of speaking in front of a group sent me into panic mode; but now I willingly accept the invitation.  Why the sudden change?  I have learned that when I am passionate about something, the fear of public speaking goes away.  Teaching is probably my calling in life, but not in the traditional sense like a teacher in a classroom.  I get excited showing others the things my family does and the lessons we have learned.  To see someone else become interested in what we are doing is very satisfying.   

In one hour we covered a lot of topics including:

*Benefits of raising your own food
*Getting started
*Types of gardening (i.e. container vs. raised bed vs. tilled area)
*Canning
*Freezing
*Dehydrating
*Fermenting
*Where to purchase large amounts of produce (i.e. farmer's market, stores locally, neighbors, etc.)
*Benefits of joining a CSA (Community Supported Agriculture)
*Recipes


Pam gave everyone a packet of seeds to take home and we had a lot of stuff for them to look at.  We barely had enough time to cover all the topics and answer questions, but a handout was given to them before leaving.    


Valentine's Day Grain Mill Gift!

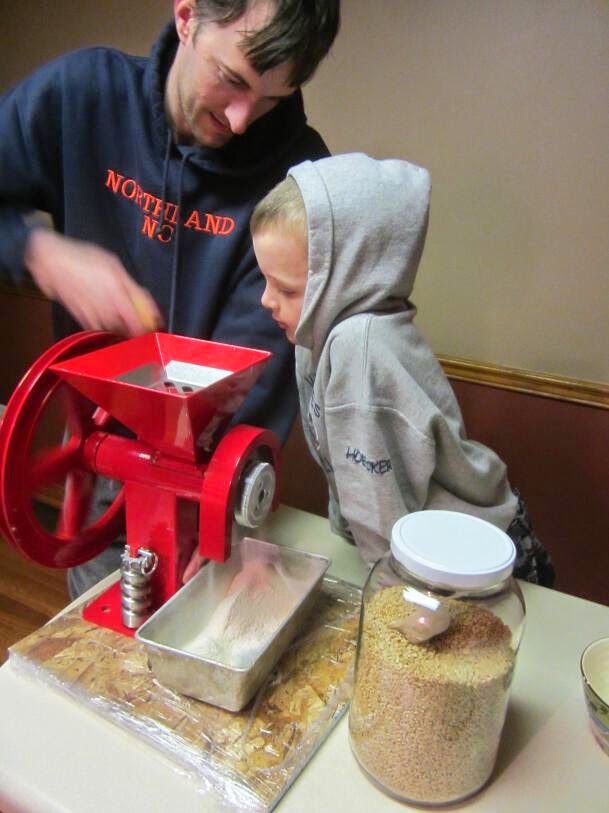
What says, "I love you" more than a grain mill?  This Valentine's Day the boys gifted me this awesome GrainMaker grain mill.  We just love homemade bread, noodles, hot cereals, and baked goods.  Grinding our own flour is the next step in having more whole grains in our diet.

Straight out of the box we couldn't resist grinding a cup of flour.  Paul was thrilled to pour in the wheat berries and turn the big "pirate wheel." 


We have the GrainMaker Grain Mill Model No. 99 which can grind grain, seeds, legumes, and nuts.

All I have to say is that we are impressed with our american made grain mill built in Montana.


Using Snow For Homemade Ice Cream

This February we received about 10 inches of snow over a few days.  We live in the Mountain State so we don't have to go far for a good sledding hill!  

Even though it's cocoa season, we couldn't resist bringing out the ice cream maker.  We haven't purchased ice cream in at least five years and find the store varieties way too sweet for our liking, not to mention all of the unnecessary additives our bodies don't need.  Snow is free and the best thing to use for keeping the cream cold while churning.  Our ice cream maker is an antique White Mountain hand crank churn we found at a flea market.   It is Made in the USA,  We have our churn sitting inside a 5 gallon pail because there is a crack on the bottom that leaks water.

After 30 minutes or so of churning the cream is starting to thicken. 

The key to using old churns is to submerse the entire bucket in water for at least 24 hours before using it so the wood slats swell and hold the ice water.  As you can see, even with a slight crack, the pail still holds the ice water pretty well.  It took five days for the pail to dry out again.

Yum...mint chocolate chip ice cream!  There are recipes using snow with the milk, but we prefer the recipe found on the back of the Morton Ice Cream Salt box.  We reduced the recipe by half with a few other slight variations:
 Recipe:
1 1/4 cup granulated sugar
1/2 T lemon juice
1/8 tsp. salt
3.5 cups heavy whipping cream (local Homestead Creamery brand)
 1 cup whole milk (Whole Creamline Milk Homestead Creamery brand) 
 1 tsp. vanilla extract
2 tsp. mint extract 
2 drops green food coloring
1.5 cups chopped chocolate chips (Ghirardelli Bittersweet chocolate). 

According to several websites, this White Mountain Ice Cream churn was made in 1923.  More than 90 years and the thing still works!  I can only imagine how many revolutions that handle has had in its life so far.


Picky Eater? Let them eat dirt.

Do you have a picky eater in your house? Well, we'd thought we'd share our story on how we raised Paul, and how this kid will eat anything.  The key was we didn't give him choices when he was a baby. He ate what was on the table or he went hungry. We didn't dress up his food with salt or sugar either. In fact, to this day the kid goes through a 25 lb. bag of Bob's Red Mill Oatmeal about every 5 months! It's a fixture at the breakfast table. He eats a heaping cup of dry oatmeal with boiling water poured over the top without any sugar added. After about a year of this, we started adding raisins. In fact, if you put brown sugar on it, he says its too sweet - that goes for a lot of things like pop/soda, chocolate, ice cream...etc.


Paul just ate a handful of dirt and he didn't like it. We did help clean him up...


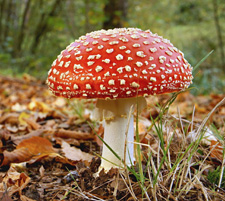
Paul has always been given the option to forage in the garden, and let me tell you...he takes advantage of this freedom. Throughout all hours of the day he will eat raw fruits and vegetables. At first, when he was little, we felt the need to restrict him because he was becoming a pest: eating small bites here and there (when produce was under ripe), breaking vines, trampling seedlings, etc.but Paul was in love with the garden and we were in love with him so it all worked out. Tomatoes, snap peas, broccoli florets, any type of berry, okra, the list goes on and on, he loved foraging. He even knows what not to eat. I think when he was three we showed him a picture of a fly agaric mushroom and said it's a "bad" mushroom. A few weeks later in the dentist office, Paul saw a picture of this mushroom on the wall and exclaimed excitedly "Daddy, that can kill you" (while pointing to the mushroom). So, he knows to ask us before eating a mushroom. We only eat wild oyster and chanterelle mushrooms, and we grow shiitake; anything else he has to ask us about.
Fly agaric mushroom

So a pleasant side effect to all of this is Paul has eaten a lot of dirt, and the kid was perpetually sick the entire first year of his life. Since then, he has maybe had one minor cold. We're sure his little body built up a ton of antibodies and strengthened his immune system so much that he could live in a germ palace and do just fine. Just don't let your kids eat dirt that has been treated with fertilizers/pesticides etc. Our garden is 100% organic/pesticide free so we didn't have that fear.

Eating dirty strawberries...

Eating dirt in the blueberry patch...


Taking care of the strawberries


Mmmm blueberries with dirt...


Foraging for beans
Not going to eat the chicken...

Big Carrot!
Eating peaches
Hunting for Mushrooms
Fresh Corn

Eyeing the trunk full of raw apples (they're not pretty, they may have a worm, but to Paul they're heaven).

A fully loaded apple tree (this tree was only two years old and gave 2 dozen apples)
He loves his fruit and veggies.


About this blog

A weekly update on our adventures of trying to be more self-sufficient by using resources wisely. We explore a variety of topics that most broadly fit in the "Homesteading" category, i.e. beekeeping, organic gardening, edible landscaping/fruit forest, food preservation/canning, woodworking, soap-making, and environmental stewardship.

Search My Blog

I've been featured on:


Followers

Facebook

Contact Form

Name

Email *

Message *

Powered by Blogger.