Simply Resourceful

Simple ways to be more conscious about how we use our resources.

Recycling Program in New Community

Our feet are now in West Virginia, our household goods are in the back of semi truck somewhere on the interstate, and our hearts are in limbo.  We are not sure what to think of our new digs because we are currently living in a hotel room.  As usual, the banks extended closing for at least another week because the 3rd underwriter discovered that our loan was in the wrong "class" because of the acreage.  They also requested to have handrails installed in the garage and barn.  This is not the news a buyer wants to receive three before closing when the movers had already packed all of our stuff.  So...we are trying our best to roll with the punches and not pull our hair out while living in a hotel room surrounded by fast food restaurants.  It was a bit of a letdown to not see recycle bins in the hotel and to be eating on disposable dishware the first day.  Thankfully, the hotel uses enviroware dishware which is made with recyclable material and is biodegradable; but who knows what that really means and under what conditions these items actually degrade.  It is the next best option to durable-ware though.

I challenge myself to see the glass half full and see the lack of curbside recycling as an opportunity to make a difference in this new community.  I am already conjuring up a letter that I will send to the waste haulers and city about the recycling program.  (And who knows, maybe I'm creating a job for myself??)  At this time, recycling is provided, but folks have to haul it to a facility, and at this time, I don't even know what is collected.  It is a bummer that we will have to store recyclables in the garage because that means less space to work in; BUT that also challenges us to reduce and reuse more because recycling is essentially the last resort.  So...in the meantime, we have a paper bag collecting all of our paper in the hotel room.  Looking back, I was in 4th grade (1993) when I helped deliver recycle bins to residents in my hometown with a population of 5,018 people.  This rural town in Wisconsin manages to pick up recyclables at the curb with a horse trailer today.

The glamour and glitz may be missing from their recycling program, but if there's a will, there's a way!


Propagating Plants, Gathering Roots, and Digging Up Bulbs

In a few short days, I will be standing on West Virginia soil.  With emotions changing moment to moment, I remain steadfast in completing my to-do lists and saying my "goodbye's."  My list today: unplug refrigerator (so it can defrost), gather garden plants, and take kitty to vet for her travel certificate.  For the garden plants, I gathered a few plants, some roots, and some bulbs.  The bulbs consisted of some lilies, alliums, daffodils, and crocuses.  I also propagated blueberries and a cherry bush.  This is my first experience propagating so we'll see if roots develop, especially since they will be placed in a cardboard box for about 2 weeks during travel.

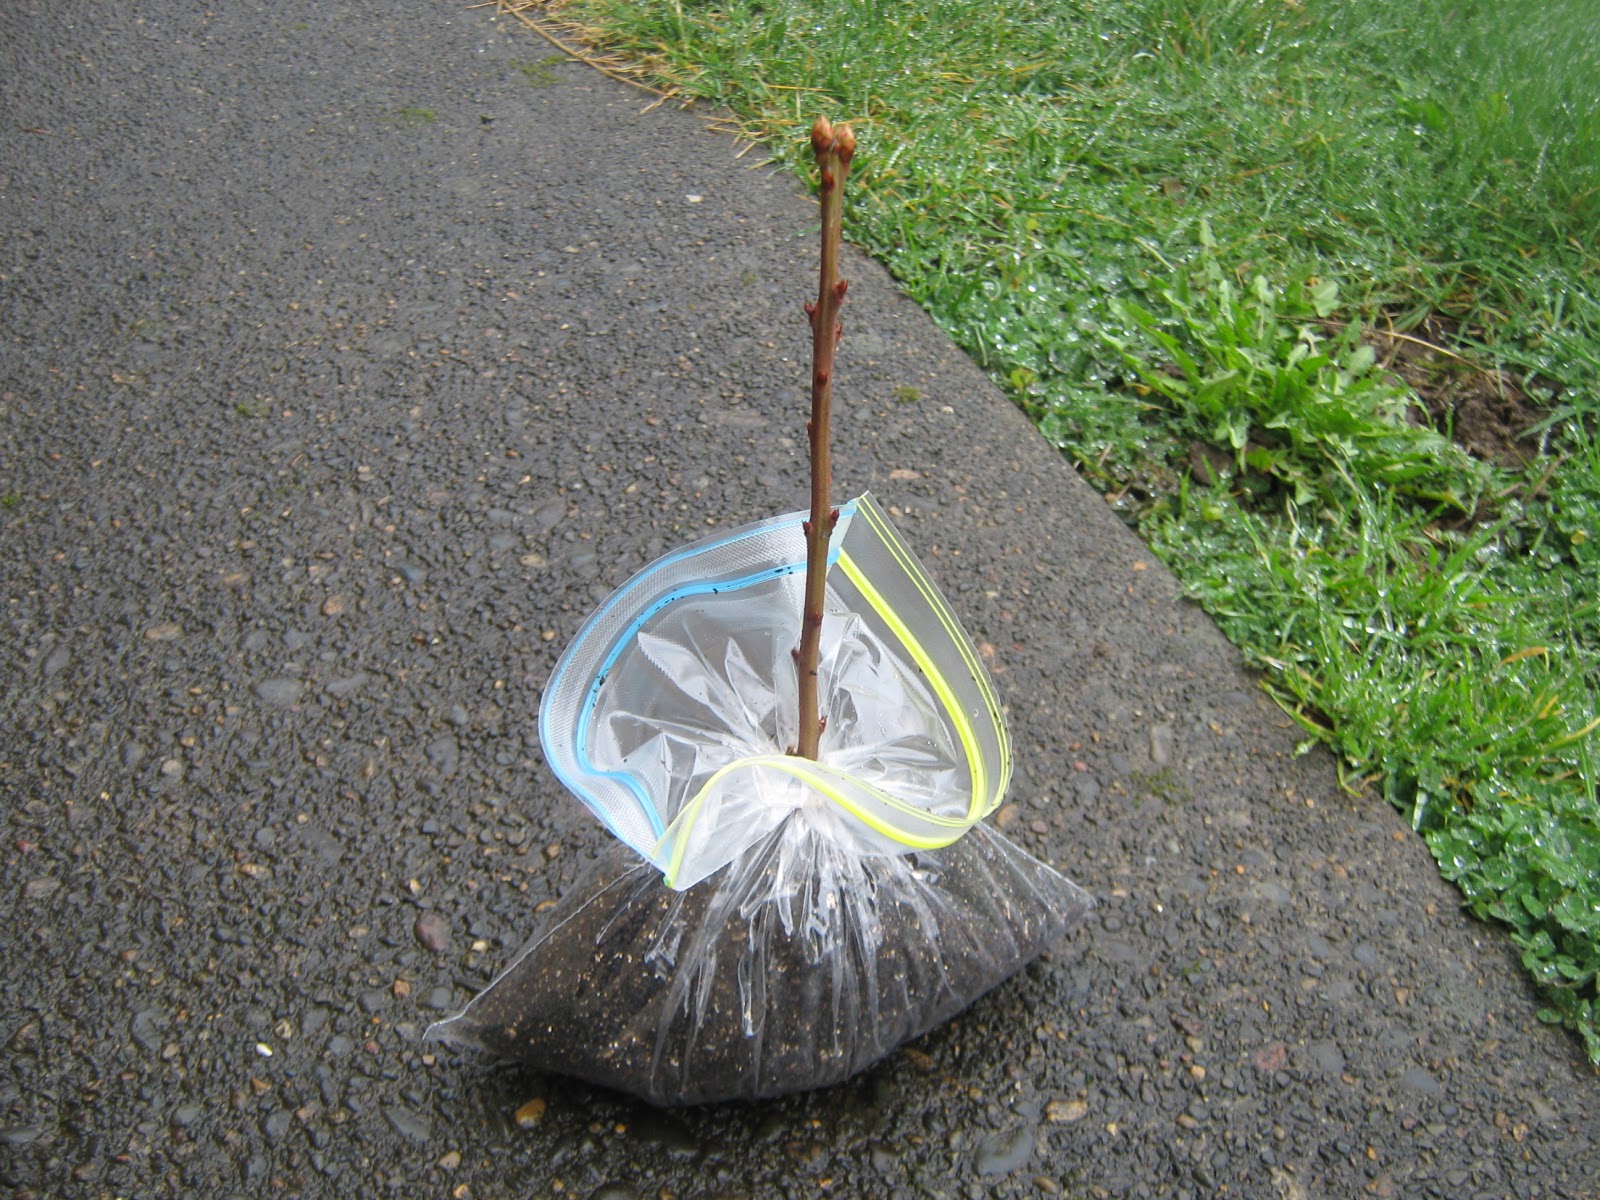
For propagating, I selected healthy stalks, about 6 inches long and cut the stalk right below a node.

The stalk was then dipped in a rooting hormone powder. 

Excess powder was shaken off.

I placed some soil in a bag, made a well in the middle, and placed the stalk in the well.

Using a rubberband, I secured the bag around the stalk.  It's fairly loose to allow moisture to escape. 

Here are some of the blueberries that were propagated.  I also propagated a cherry bush---not sure if that will work, but we'll find out!

The next task was digging up some of the strawberries for the new home.  The picture above may not look like much, but this little plot provided enough strawberries for fresh-eating and filled 2 gallon freezer bags full last summer!  This strawberry patch provided the most yield for its space and required the least amount of work than other plants in the garden.  Best of all, our son picked almost all of them for us!

I filled a box about half full of strawberry plants.  I estimate there are about 50 plants total which didn't even make a dent in the patch.


The next project was gathering blackberry roots.  In the picture above, the "mother" blackberry plant is in the upper right corner and my hand in the lower left is holding two roots.  From what I found online, clip about 8 inches of root coming from the "mother" root.  

I only gathered 4 root clippings because this blackberry plant is only 3 years old.  It may have been too young to gather roots from.  Unfortunately I will never find out if the "mother" plant survives because I won't be here this summer.  I can only hope...

I also gathered two shoots from the rhubarb plant (leaving 5 behind).  Again, this is another experiment---I had to brake these 2 shoots off the main root, but also make sure that the main root I gathered had some small roots growing from it. 

I got a little shovel crazy trying to uproot the giant rhubarb mass; because of this, I broke off a root section.  I was surprised that the root was so large---about 1.25 inches in diameter!!  The root smelled like fresh rhubarb!


Emptying the Freezer & Packing

If you have ever moved a long distance, then you know how it is to go through every nook and cranny, and empty your entire refrigerator and freezer.  Our freezer was packed with pesto, tomatoes, carrots, turkey, turkey broth, pumpkin, sausages, strawberries, and blueberries.  With some planning, I carefully spaced out our turkey vegetable soup and pesto dinners.  Even Paul said, "We're having soup...again!!"  We've pretty much exhausted ourselves of the same dinners over and over.  Thankfully we have eager friends who have joined us for dinners the last couple of weeks.  It is nice to see someone else get excited about turkey pot pie and pesto pasta when I can only manage a half-smile after eating the same ingredients for 2 months.

I am very anxious about moving the several hundred full jars of canned goods across the country.  Oh, my beloved peaches...I hope to enjoy you next year!  I expect the worse...saturated cardboard boxes full of broken glass; but I am trusting the "professionals" who pack homes for a living.  To ease the anxiety, I decided to put all the rings back on the jars to keep contents from spilling completely out just in case a seal breaks.  In the process of attaching the rings, I found this...an unsealed jar of grape juice.  This is my first jar that has gone bad!  The seal failed and the contents grew mold...Yuk! 


Besides emptying the freezer and using up condiments, our biggest area of purging has been in the garage!  The moving company won't move lumber or logs.  So....Jon and I had to look at the big sustainability picture and decide which pieces of wood were really worth moving 2,500 miles.  Without argument, we decided to keep all of our aspen logs that we collected in Laramie, WY back in 2005/2006.  To some, these logs look like firewood, but to us...furniture!  We have been holding onto these logs for 5 years hoping to make more chairs, beds, and sofas for when we have a larger home.  As for the remaining 2x4's and plywood, we gave them away to friends even though the wood could be used for our next project...a chicken tractor for our new home.  It is silly to say we are attached to our wood, but we are constantly in the garage making toys, bat houses, furniture, and other things out of small pieces left over from larger projects.  I included a few pictures of our log furniture for those who may be interested.

We are attempting to sneak these logs onto the moving truck by packaging them ourselves (the moving company supposedly doesn't question items we pack) We wrapped the logs in burlap bags tied with rope and string.  The bags came from a local coffee shop and are primarily used as bee fuel for the smoker. 


In 2005/2006, Jon and I snowshoed the Rocky Mountains and cut down dead aspen trees using a hand saw with a fire permit.  We were very selective when choosing the logs and went long distances to ensure we left behind some dead wood for animals.  This is how we entertained ourselves when we had no money and a lot of time.

Our first project...a kitchen chair, waiting for the finishing touches. 

Coffee table


Uses for Dryer Lint

Dryer lint is one of those things that I started saving.  Yes, I know it's weird, but I actually started a bag specifically for lint.  I read recently that I should store lint in a tin can or glass container, but right now it's in an old plastic bag in the laundry room cupboard.  Because lint is easily combustible, it is recommended that you clean out your dryer vent on a yearly basis.  Cleaning out excess lint also increases the efficiency of your dryer, leading to shorter dryer periods and less energy consumption.  To clean the dryer vent, I pull the dryer several feet away from the wall, disconnect the vent hose from the dryer, stretch the hose, and blow the hose out with an air compressor (or leaf blower).  I also blow out the dryer vent from the inside of the dryer.

I started collecting lint in October (because of course I use a clothes line in the summer), and in 3 months I collected this much.

There are many uses for dryer lint.  One of my friends makes her own paper with lint which is super impressive!!  Click on the pictures below to see her cards.


I did a quick Google search for other dryer lint uses and here's what I found
  • Fire starter
  • Paper
  • Packing material
  • Spin it into thread and knit or crochet with it
  • Spread it in the yard for the birds (Depends on the detergents you use)
  • Make clay with it
  • Put it in your compost pile
  • Craft projects
  • Plant mulch
And for a little humor... (click to enlarge)


Homemade Conditioner

After using my homemade shampoo for about 6 months, I decided to try homemade conditioner.  I found a random assortment of recipes online and decided to give two recipes a try.  I didn't keep track of where the recipes come from, otherwise I would give credit to those who originally provided me the idea!

Recipe 1:  
Vinegar Rinse:
4 cups very hot water
3/4 cup vinegar
~2 T each dried rosemary & chamomile

Tie the herbs in a cheescloth bag and combine with other ingredients in a bowl.  Cover and let steep overnight.  In the morning, remove the herb bag.  To use, work in up to a cup of the vinegar after you shampoo and rinse well.

I use 1/2 cup vinegar and that's enough for me.  Surprisingly my hair doesn't smell like vinegar!  I am really surprised at how tangle-free my hair is immediately after the shower and how soft it feels!

Everything is ready to combine...

Steep the herbs...

In the morning I add the cool mixture into an empty dishsoap bottle and store in the shower.

Recipe 2:
1 1/3 cups water
Xanthan gum (1/2 tsp for gel; 1/4 tsp for conditioner)
Guar gum (1/2 tsp for gel; 1/4 tsp for conditioner)
2 tsp. oil (canola, olive, jojoba)
Scents (optional)

I used a clear mason jar when mixing everything so I could see the process.  I then transferred the finished product into an old conditioner bottle. 

Instructions: Measure the water into the jar and sprinkle the gums into the jar, shaking vigorously after each sprinkle to avoid clumps.  If you get clumps, smash them with a utensil against the side of the jar to break them up.  After I finished everything, I removed the few remaining clumps.  Next, add the oil and shake the jar to incorporate it really well.  You want it mixed in well enough so you don't see a layer of oil sitting on the top.  

*Adjust the oil content to your liking.  If you find it too oily, reduce the oil amount; more if you have dry hair. 


Homemade Vinegar


I attended a vinegar making class at the Hollywood Library on Oct. 23rd.  Author, Jean Johnson, of Hippie kitchen : a measurefree vegetarian cookbook taught the class.  She also has a blog: Measure Free Hippie Cook.  Jean is one of those people who light up the room.  She spoke with enthusiasm and inspired everyone!  I sum up a lot of what I learned from the class below:

-To make homemade vinegar, you need a mother culture.  This "mother" will multiply in your solution and you can divide it whenever you start another batch (kinda like sour dough starter).  Only a speck of "mother" is enough to inoculate an entire jar. Jean mentioned that when she was a young girl (in the 60's), all vinegar purchased at the store had "mother" in it.  She remembers seeing the hazy, filmy, layer resting on the bottom of the jug.  When pasteurization became wide-spread, the "mothers" were killed under the high heat.  Each attendee at the class was given a "mother" to start their own vinegar at home.  If you don't know someone with homemade vinegar, then you can get some mother from unpasteurized vinegar from the grocery store.

-To make vinegar, you only need peelings and cores from fruit.  Apple, pear, and pineapple peelings are excellent.  Since I have only made vinegar with pears and apples, I don't have an inclusive list of fruit, sorry.

-Just to be on the safe side, don't use homemade vinegar for canning or preserving.  Botulism is not something to mess with, and when pickling, the acidity levels need to be spot on!

-Once the vinegar is to your liking, you can add raspberries, herbs, and other flavorings.  I haven't done this, but I suppose you would add the fruit or herb and let it marinate for a few weeks.

-You can use the vinegar for cooking and cleaning.

How to make vinegar: 
-Sterilize the jar you will be using.  Any jar will do, but select a jar that will leave about a 1 inch head space when full.
-Add fruit peelings and cores.  Do not include bruises or wormy spots---they can taint the flavor.
-Add enough water to cover the fruit and then some.
-Add the "mother" to the jar.
-Add sugar to the jar if you prefer.  Sugar will speed up the fermentation process but it's not necessary.  The sugar in the fruit should be enough.  The sugar will probably add a little flavor too.
-Cover the jar with cheesecloth and put a rubber band around the rim.  To keep fruit flies out, be sure to overlap your cheesecloth layers or use a t-shirt if you don't have cheesecloth.  Airflow is important here---without it, you can't make vinegar.
-Set the jar in a dark place where there is adequate airflow with temperatures between 65-80 degrees.  I leave mine on the counter behind my mixer because I don't have any other place in my house that is out of the way and receives adequate air flow.
-When the fruit darkens (about 3-4 weeks), remove the fruit and let the mixture sit with "mother" all alone.
-When is the vinegar finished and ready to use?  That all depends on how strong you like your vinegar.  Jean says 6 months or so.  She knows hers is finished by how it tastes.
-Mother can be removed once the vinegar is finished or it can be left in the jar.
-If you remove the mother from the finished vinegar, it can be stored in a mason jar in the refrigerator with a little vinegar in it so it doesn't dry out.

I started out with one apple core and a little mother in a quart mason jar...  

Then I decided to make a large amount of vinegar by using the squished apples from the cider press

Here is the finished vinegar!

This is what the mother looks like.  It's kind of like a Kombucha pad. 


What can I do with vinegar?  I am constantly learning about things I can do with vinegar.  My main use is for cleaning.  I use it on my tile and hardwood floors, countertops, mirrors, windows, walls, etc.  I mix 1/2 cup vinegar with 5 cups warm water.  I always dilute it and it seems to work just fine.  


Ironically, one week before I took the vinegar class, a Yahoo headline was all about vinegar.  I listed the article's uses for vinegar below, but for more detailed information about each item, go here. 
  • Condition hair
  • Kill weeds
  • Remove underarm stains
  • Soften fabrics
  • Remedy sore throats
  • Deter ants
  • Soak sore muscles
  • Freshen air
  • Remove stickers
  • Cure hiccups
  • Clean crusty paintbrushes
  • Dissolve rust
  • Eliminate stale odors
  • Remove mineral deposits
  • Neutralize spice in foods
  • Prolong the life of cut flowers
  • Clean glass, plastic, chrome, and floors
  • Treat fungal infections
  • Tenderize and kill bacteria in meat
  • Open drains and freshen garbage disposals


Making and Bottling Perry (Sparkling Pear Cider)!!

Today we had our first experience bottling wine!  We started our Perry (sparkling pear cider) on September 24th when we gleaned pears from a neighborhood lot that was for sale.  I used a juicer to extract the juice and used the pulp for pear butter.


Perry recipe:
1 gallon pear juice (12-14 pounds)
sugar to 1.060 Specific Gravity (S.G.)    (~1/4 cup/gallon)
1/2 tsp. Pectic Enzyme
3/4 tsp. Energizer
1 Campden, crushed
1 pkg. Champ. yeast
  • In a food grade bucket, add campden to juice to prevent spoilage and browning.  Stir in all other ingredients except yeast.  Cover.  
  • After 24 hours, add yeast.  Cover.
  • Stir daily, check S.G..  When ferment reaches S.G. 1.040 (3-5 days), syphon off wine into a carboy (leave sediment behind).  Attach airlock.
  • When ferment reaches 1.000 (about 3 weeks), syphon off sediment into another carboy.  Reattach airlock.
  • To aid clearing, syphon again in 2 months and again if necessary before bottling.
When ferment is complete, gently stir in 1/4 cup dissolved sugar per gallon.  Bottle in champagne or returnable pop bottles.  Age for 3 months.  Cool and enjoy!

I included some pictures of the process below.  I also included a video of the bottling process: 


Make sure your pears are firm and ripe.  We used Bartlett pears. 

This is what the carboys looked like after sitting for 2 months.  Sediment and dead yeast is at the bottom.  

This is what the jar looks like after syphoning off the wine.

This is how you check for specific gravity (S.G.).

Bottles given to us from our friends.  It's amazing what a simple email brings someone.  We are eternally grateful that we didn't have to purchase bottles.  To remove labels, soak in warm water and use a razor blade.

We invested in this carboy lifter.  These carboys get very heavy and can be difficult to hold.  The clear/white thing is an airlock.  It lets carbon dioxide out but doesn't let anything in.

Before bottling, all supplies need to be sanitized, including the bucket and spigot.  We use a Star San sanitizer solution.

This is the syphoning process.  The wine flows through the plastic tubing from the carboy to the bucket.  When syphoning, you have to be careful that you don't suck up any of the sediment on the bottom...you want a clear wine. 

We added 3/4 cups granulated sugar to our 3.5 gallons of Perry.  The sugar was dissolved before bottling. 

Fill the bottles with wine leaving about a 2 inch head space.  The bottle is dark green so it's hard to see it in the picture. 

The cork is being inserted into the bottle with the help of a floor corker.  We used #9 corks and don't know if they are the correct size for what we bottled.

This is the floor corker we purchased at Portland U-Brew & Pub for ~$60.00.  We chose this corker because it's metal and very sturdy.  Many people recommend a floor corker because it's less cumbersome than the hand corkers.  

3.5 gallons yielded 16 bottles and 2 grolsch bottles. 

This is our first year making wine and we have a few questions.  If you have advice, please submit in the comments section, thanks!

Question 1: How do you know when to cork vs. cap the bottles?  Does it matter?  
Question 2: Is it safe to reuse bottles from the grocery store or does it depend on what you're bottling?
Question 3: How do you know what size cork to use?
Question 4: Can wine ever really spoil?  I've always been told that wine gets better with age, but isn't there a chance that the cork could fail and potentially leach bacteria in the bottle?  
Question 5: How do you get bottles dry inside?  I washed the bottles with warm soapy water and after 4 days, some of the bottles were still full of condensation.  I don't have a wine rack dryer---would that do the trick?  Some bottles dried really quickly and others never completely dried.  I noticed the bottles with thicker glass tended not to dry.


About this blog

A weekly update on our adventures of trying to be more self-sufficient by using resources wisely. We explore a variety of topics that most broadly fit in the "Homesteading" category, i.e. beekeeping, organic gardening, edible landscaping/fruit forest, food preservation/canning, woodworking, soap-making, and environmental stewardship.

Search My Blog

I've been featured on:


Followers

Facebook

Contact Form

Name

Email *

Message *

Powered by Blogger.