Simply Resourceful

Simple ways to be more conscious about how we use our resources.

Harvesting Walnuts: Take 2!

Last Fall I harvested walnuts for the first time and didn't have very good success.  This year I decided to try it again and how lucky I am to have 5 black walnut trees in the yard at our new house!  I say lucky, but not really, because those pesky nuts are a pain to pick up every time the lawn is mowed.  Compared to last year, this time I had much better success with harvesting the nuts.

I had a pretty basic setup in the front yard.  The nuts that needed to be hulled were on one cardboard box area and the ones drying were on another.  I used a rock to break the hulls off. 

The hulled nuts were added to a bucket of water.  The floaters were removed because that signifies the shell is empty. 

The nuts were rinsed several times to remove the hull residue.  The water doesn't have to be perfectly clear...just not really dark.  In the bucket you can see some fabric.  I was dying a treasure map for my son's birthday party.  Walnut dye is great for "antiquing" fabric.

After the nuts were washed, they were placed on cardboard and left in the sun for a day or two until they were dry.  We don't want the nuts to mold while they are curing. 

The nuts were then hung in onion sacks in the basement.  There are a lot of different recommendations for storage times.  Two weeks was just the right amount of time for us because some of the nuts inside the shell were starting to shrivel up into nothing. 

To crack open the nuts I used a hammer and a brick.

This nut looks perfect!


There was a wide range of ripeness from the nuts I gathered. 

Black walnuts have a much stronger flavor than English walnuts; because of their intense flavor I actually use less in my recipes. 


Storing Carrots in Boxes For the Winter

"Our children should enter adulthood with a basic knowledge of how to store food over winter without the cooperation of a nuclear power plant (or coal, or hydropower, etc.).  Every animal in the forest is taught this skill; we owe our children no less."   by: Jerry Minnich


This year I started exploring a broader view of preserving food now that we have a basement and the winters are cooler here.  As much as I enjoy looking at vegetables and fruits through the hundreds of jars I fill every year, I would like to minimize my carbon footprint and minimize the energy use that goes into canning.  I borrowed several books at the library about keeping a root cellar and I listed my two favorites below and included a general review of each book.  Besides basic squash, potatoes, garlic, and onions, I wanted to go a little further this year and try keeping fresh carrots.  We don't know the average temperature and humidity levels in this new house so we started small and kept a few dozen carrots in a cardboard box to see how it goes.  Here's how to do it:

1. Dig up the carrots carefully on a dry day, shake off the excess soil, and twist off the tops.  Don't scrub or wash the carrots, as this may damage the skin.  Examine each carrot and set aside any that are damaged to use immediately.

2. Choose a shallow cardboard box, wooden box, or crate.  Line the bottom with newspaper, or similar material, and put a thin layer of spent compost, moist sand, coir, untreated sawdust, vermiculite, or leaf mold in the bottom.

3. Arrange the carrots side by side, without touching, on the covering material.  Position the carrots so that they lie head to toe.

4. Hide the vegetables with more covering material and repeat until the container is full.  Finish with a layer of covering material to exclude light.  Store in a cool, preferably dark place such as a garage, cellar, or spare room for 2 months or more  Use as required, ensuring the remaining vegetables are kept covered.

Ideally carrots require 32-40 degrees F and 90-95% relative humidity for storage.

We used sawdust and shavings that came from the love seat we made this summer.  It's aspen wood that we collected ourselves from the woods so we know it's untreated.

First layer...notice that the carrots are not touching.

More sawdust and shavings covering each row.

Results: I only put about 3 dozen carrots in the box because I didn't know how successful this method would be and I didn't want to waste any carrots.  The carrots were picked the second week of September and the box was empty by the first week of October.  The temperatures were still in the 70's throughout the month of September so it never really got cold.  Overall the carrots stayed relatively firm for the 3 weeks they were in the box.  The smaller ones got a little rubbery but they were still usable.  Next time I will use larger carrots and plant the seeds later in summer so they can be harvested when the temperatures are cooler.  The sawdust also felt warm to me so next time I will try sand or another material that stays cooler. 

Books:

Preserve It! by: Lynda Brown  This book is a great introduction on different preserving methods: canning, drying, freezing, smoking, brewing, salting, and natural cold storage.  For a more in-depth book, I recommend the following:

Root Cellaring: Natural Cold Storage of Fruits and Vegetables by: Mike and Nancy Bubel
This book is a must-have if you are really serious about keeping food throughout the winter using natural cold storage methods.  The book is very thorough about when and how to grow and harvest vegetables and fruits; which varieties keep best throughout the winter; storage requirements for your edibles; ways even an apartment and city dweller can use natural storage methods; how to build a variety of different types of root cellars; testimonies and building plans of people who use root cellars; and recipes for your cellar crop!


Homemade Cinnamon Raisin Bagels

This recipe comes from "Healthy Bread in Five Minutes a Day" ( One of Jon's favorite bread books ). 


Master Dough Recipe
5 1/2 cups whole wheat flour
2 cups unbleached all-purpose flour
1 1/2 tbsp (2 packets) granulated yeast
1 tbsp kosher salt
1/4 cup vital wheat gluten
4 cups lukewarm water


Cinnamon Sugar Bagel Recipe
2 pounds (cantaloupe-size portion) Master Recipe dough (1/2 the batch)
2 tbsp sugar
1 1/2 tsp cinnamon
1/3 cup raisins

For the boiling pot:
6-8 quarts water
1/4 cup sugar
1 tsp baking soda

This recipe makes about 8 bagels.

Directions:
1) For the Master Recipe -- throw all the ingredients in a very large container that can be covered and stir until all the flour is incorporated
2) Put the lid on the container and set at room temperature for 2 hours.
3) Put the container in the fridge for an hour or two -- though you an wait up to a week if you want...
4) When you are ready to bake, place your baking stone in the oven and heat the oven to 425F.  Start the boiling water (you can just put all the "boiling pot" ingredients in the pot and stir).
5) Take a cantaloupe sized portion of the Master Recipe and roll it out on a well floured countertop to a 1/4" thickness
6) Mix cinnamon sugar / raisin mixture in a bowl and spread evenly over the top of the dough.


7) Roll the dough into a jelly roll


8) Cut off peach sized portions and squeeze together and eventually push your fingers up through the middle to make a hole.


9) Set bagel on a floured surface
10) Drop bagel into boiling water (I do four at a time) let it sit there for 2 minutes and then flip for another minute on the other side


11) Remove and put on a floured and cornmealed pizza peel or other surface that allows you to easily slide the bagels onto the baking stones in the oven.
12) Bake for 25-35 minutes at 425F (Time depends on how wet the bagels are)

Enjoy the yummy goodness!


Mushroom Log Update

Last fall Jon decided to inoculate some oak logs with mushroom spores.  When we moved across the country in March, the logs went with us.  The movers were a bit skeptical about moving these logs and the driver of the truck said these logs had to be the oddest thing he has ever moved.  The logs were not covered with protective blankets during the move and were instead, tucked into the smallest cranies the movers could find in the truck.  When they arrived in West Virginia they were then placed in storage along with everything else because of the closing delay.  When they finally arrived at the new house, we placed them along the tree-line in the back woods.  After all the moving and handling, and removal of the wax by the birds, I figured the logs would probably not sprout mushrooms and eventually get absorbed by the forest floor.  They were pretty much forgotten this summer and were never watered or placed vertically into the ground according to the instructions.  To our surprise, Jon discovered some mushrooms sprouting out of the logs this week!  Take a look!


3 Days later, the mushrooms grew this much!


Our first meal with the mushrooms!


What do we do with all this squash?!


Like most things in the garden this year, we planted more seeds than we needed.  In Portland, we never had much luck with squash so this summer we planted several mounds of butternuts, acorns, and pumpkins hoping for a few of each.  Well, we received more than just a few:

19 butternuts
22 pie pumpkins
22 acorn squash

What a harvest this year!  We left them on the porch to cure for 9 days and then stored them in the basement on top of a pile of newspapers and straw.  We have a crawlspace under the basement (which keeps the basement warmer than most basements) so I don't know what the best method for storing squash is for our home?  Any suggestions?

One wheelbarrow full of zucchini and pie pumpkins.

What do we do with all this squash?!  If you have recipes for ways I can fix the pumpkins besides pies, breads, and soups, please comment below!  This fall I made Pumpkin & Orange Spiced Jam and Acorn Squash Jam.  I made a batch of each and surprisingly they were both very tasty!  It is recommended that they be served with blue cheese and on top of yogurt as a dessert.  Spread on toast is fine with me!

It's that time of year again, building a scarecrow!  It's so nice having a porch with an overhang that keeps things dry.  This scarecrow will actually be left outside all season this year!


Vacation Time!


It is good to be back home after the 3 week vacation in Wisconsin and Minnesota.  We were sent home for a family wedding and decided to prolong the visit to include camping, fishing, and time with friends and family.  It was a whirlwind of a vacation with a lot of activity, but it is good to be back checking up on things and working on projects.  I decided to veer away from the normal blog posts to include some pictures of the trip since many of my blog followers have already asked me to post a few pictures from the vacation! Enjoy!

Having some good old fashioned fun with tubing behind a boat!

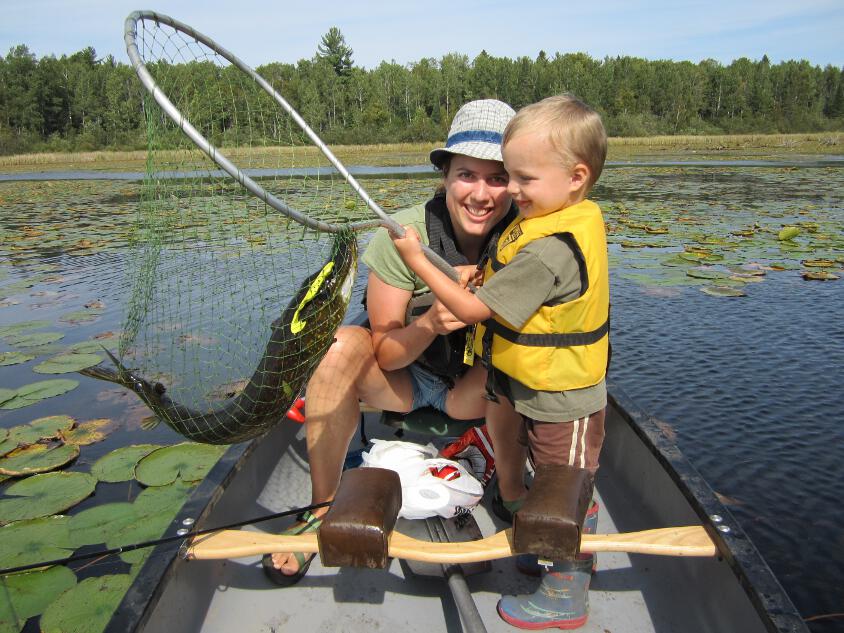
Paul is determined to catch the biggest fish on the trip

but Mamma beat him to it.  My favorite kind of lure is the frog.  I bounce it off lily pads and rocks which always results in a huge splash from a large fish such as this Northern.  We released this fish back into the lake.

To get to Perent Lake you have to paddle this very long and windy creek for several hours.  Perent Lake is located in the Boundary Waters Canoe Area Wilderness in Northern Minnesota.  If you enjoy canoeing, this is the place to go...1.3 million acres of protected wilderness.  On our trips we have seen: moose, bear, bald eagles, loons, beavers, and more.  It is a serene place where you can go days without seeing or hearing another human being.  Depending on the lake you are on, motors and airplanes are non-existent.    

Notice the big smile?  Jon is still smiling after portaging this old aluminum canoe over a very rocky portage.

Having fun at the wedding!


The First Egg!


I imagine most chicken keepers can remember the excitement they felt when they discovered the first egg in the nest box.  Our ladies have been laying for a week now and each day we are happy to discover the small eggs in their straw bed. The first week we collected 14 eggs!

I suspected that egg laying was soon to begin when I noticed a change in the chickens' behavior.  In particular they were more boisterous and started pecking at my shoes and the ring on my finger.  Seeing this change and noting that they were 17 weeks old, I decided to open the nest boxes and fill them with straw.  Besides the times when they were given watermelon and apple peelings, I had never seen such a frenzy in the coop until they were given straw.  All three nest boxes were demolished in a matter of minutes!  The coop was a mess when I returned each evening.  After 3 days of re-making their boxes, the straw was finally left alone.

I scratched eggs off the grocery list this week!  The one little brown egg looks a little lonely with all the white!


About this blog

A weekly update on our adventures of trying to be more self-sufficient by using resources wisely. We explore a variety of topics that most broadly fit in the "Homesteading" category, i.e. beekeeping, organic gardening, edible landscaping/fruit forest, food preservation/canning, woodworking, soap-making, and environmental stewardship.

Search My Blog

I've been featured on:


Followers

Facebook

Contact Form

Name

Email *

Message *

Powered by Blogger.